Featured


Your Custom Text Here
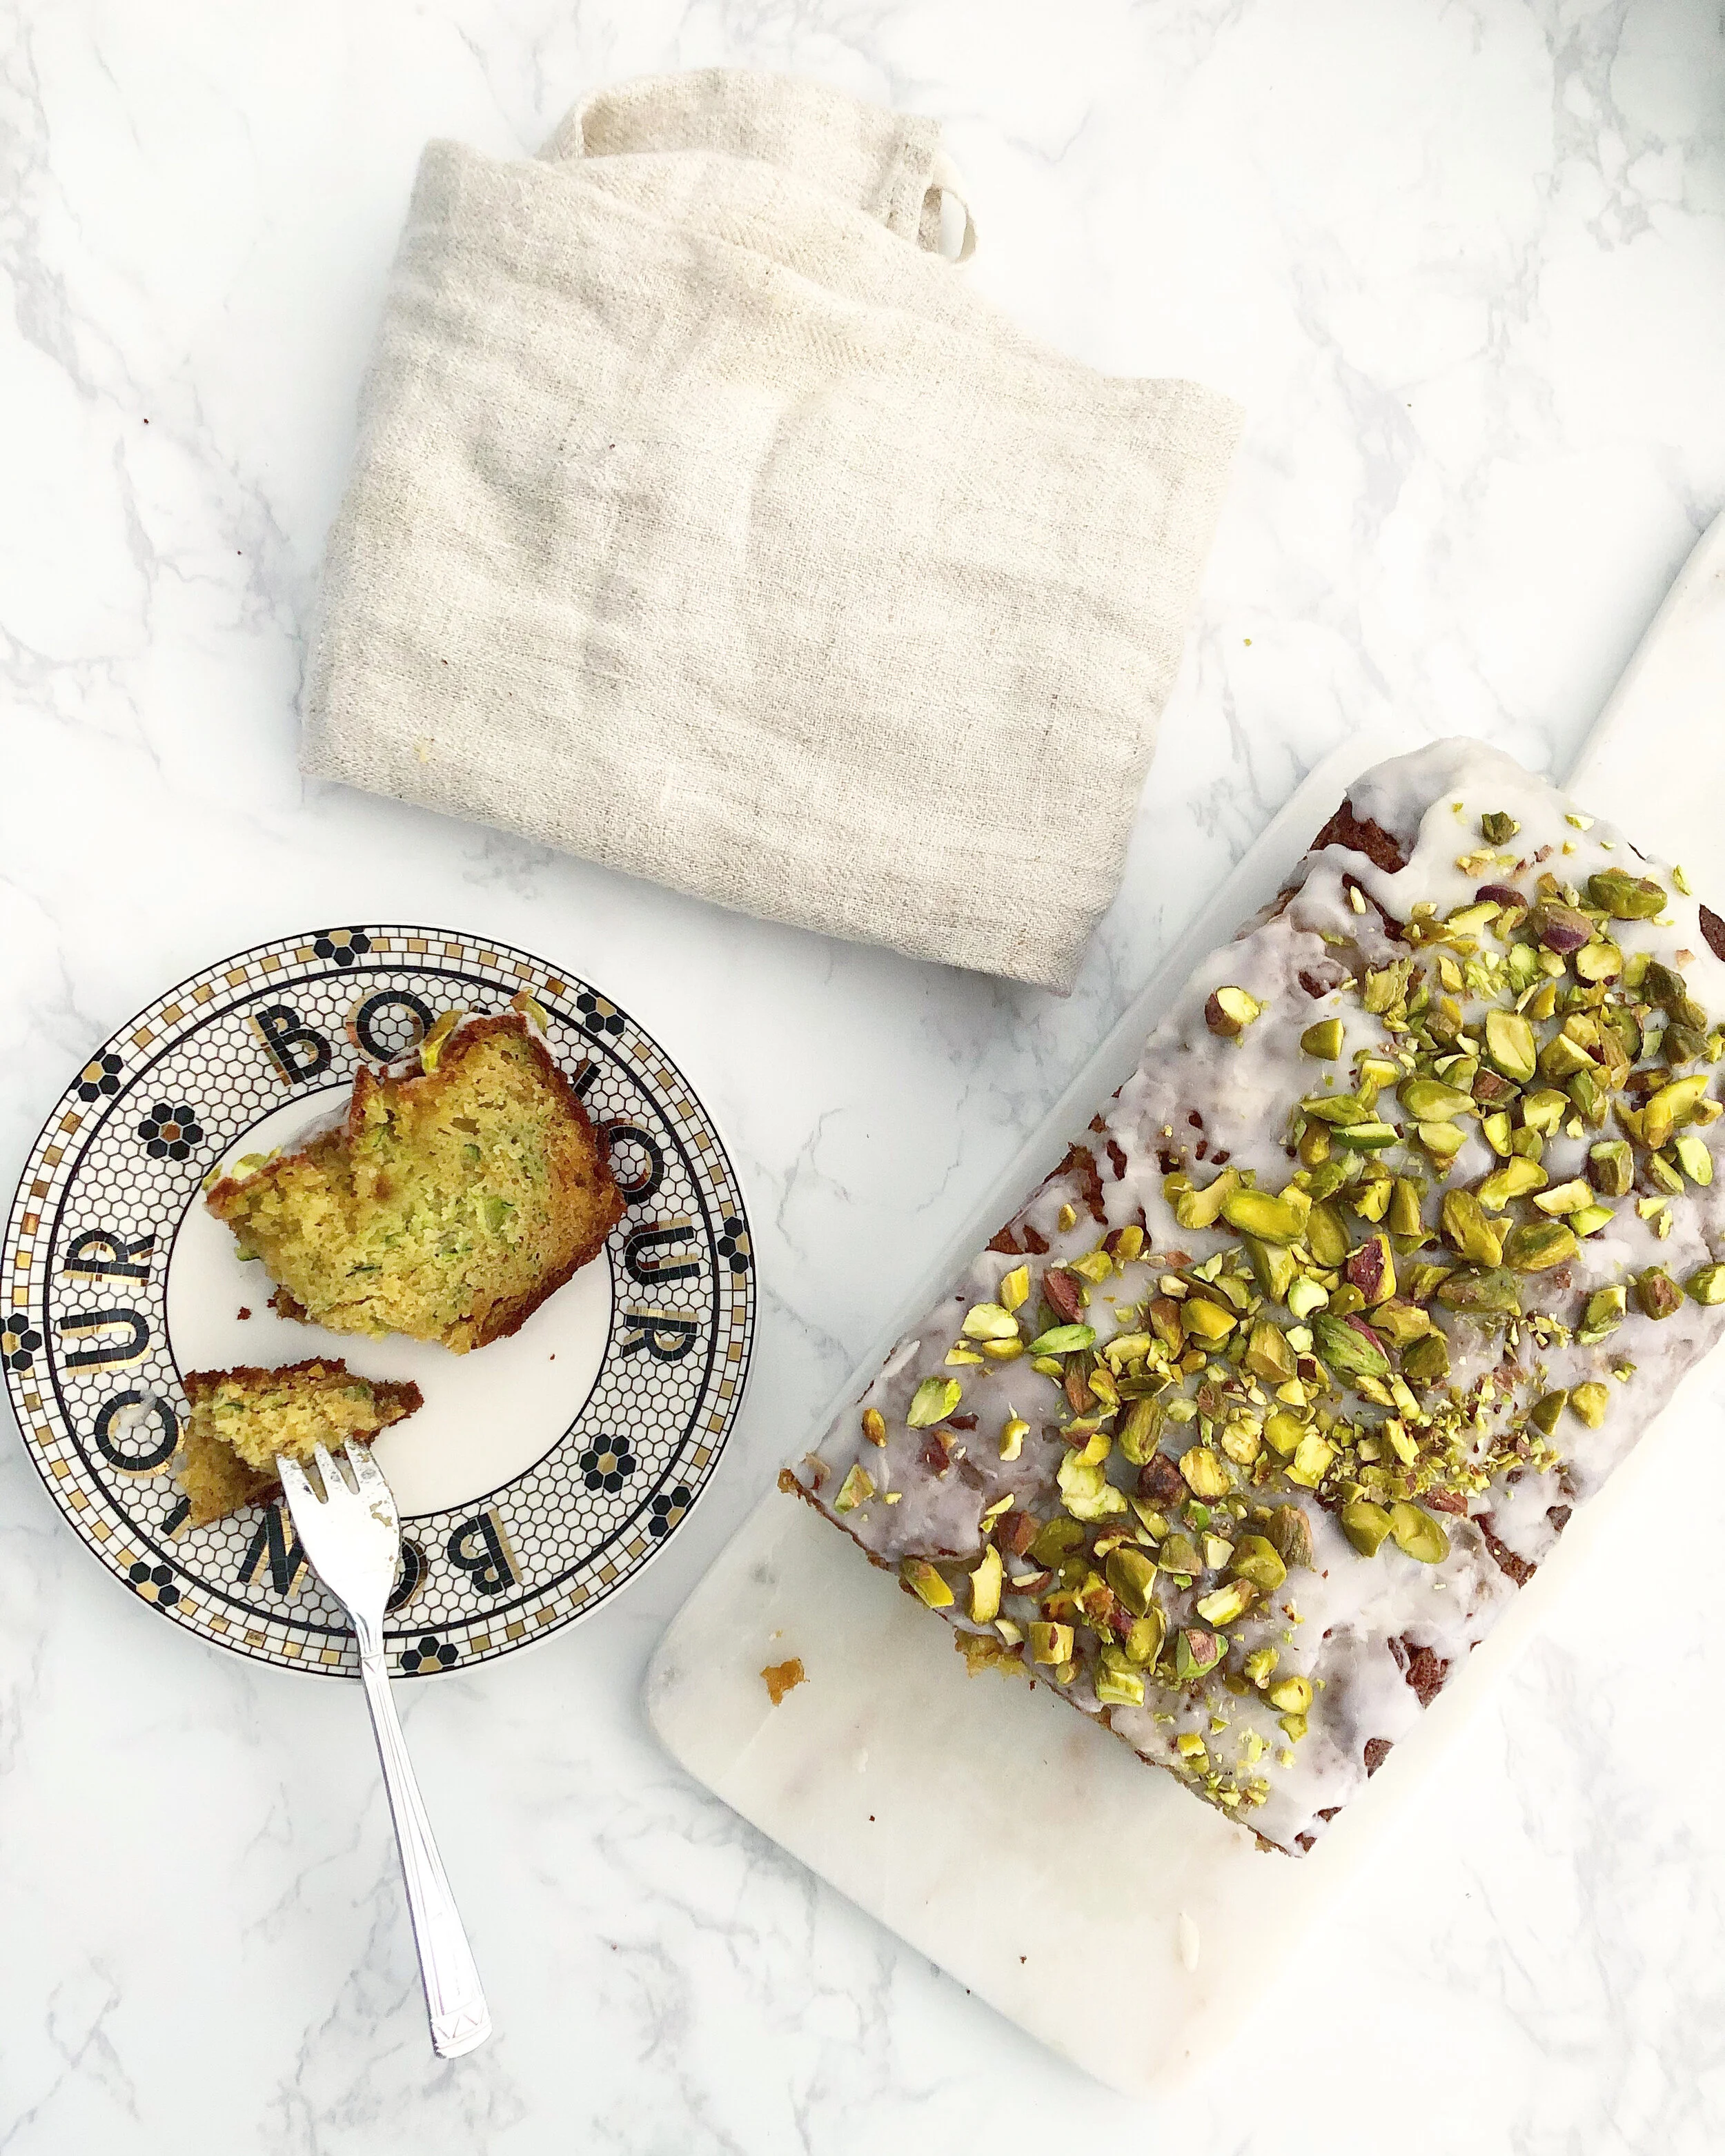
This recipe was born out of necessity last summer when I was staying at my parents house and the vegetable plot was exploding with courgettes! It is a very simple variation on a classic lemon drizzle and it tastes like a slice of sunshine.
I used lemon originally but since I've been making it with grapefruit 🍊 which gives a slightly more complex flavour but either are wonderful. I love to serve it with fresh cherries which just so happen to also be abundance at this time of year!
Preheat the oven to 180oC and line a loaf tin with baking parchment.
Grate the courgette into a large mixing bowl and add the flour, bicarbonate of soda and zest. In a separate bowl, whisk together the wet ingredients and once combined add to the courgette/flour mixture. Fold everything together until you have a smooth batter and then pour into your prepared tin. Place in the preheated oven and bake for 45-50 minutes or until golden and springs back when touched.
Whilst the cake is cooking you can make your syrup. Bring the juice and maple syrup to the boil and reduce the liquid by half. Remove and set aside.
When the cake is done, remove from the oven and using a skewer or fork prick holes all over the loaf so the syrup can seep in. Whilst still warm pour the syrup over the cake and then allow to cool and absorb the syrup before removing from the tin and placing on a wire rack.
For the drizzle: whisk together the sugar and citrus juice until you have a smooth paste and then drizzle over the cooled cake. I like to decorate it with roughly chopped pistachios which add some texture and also mirror the flecks of green through the sponge but they are entirely optional.
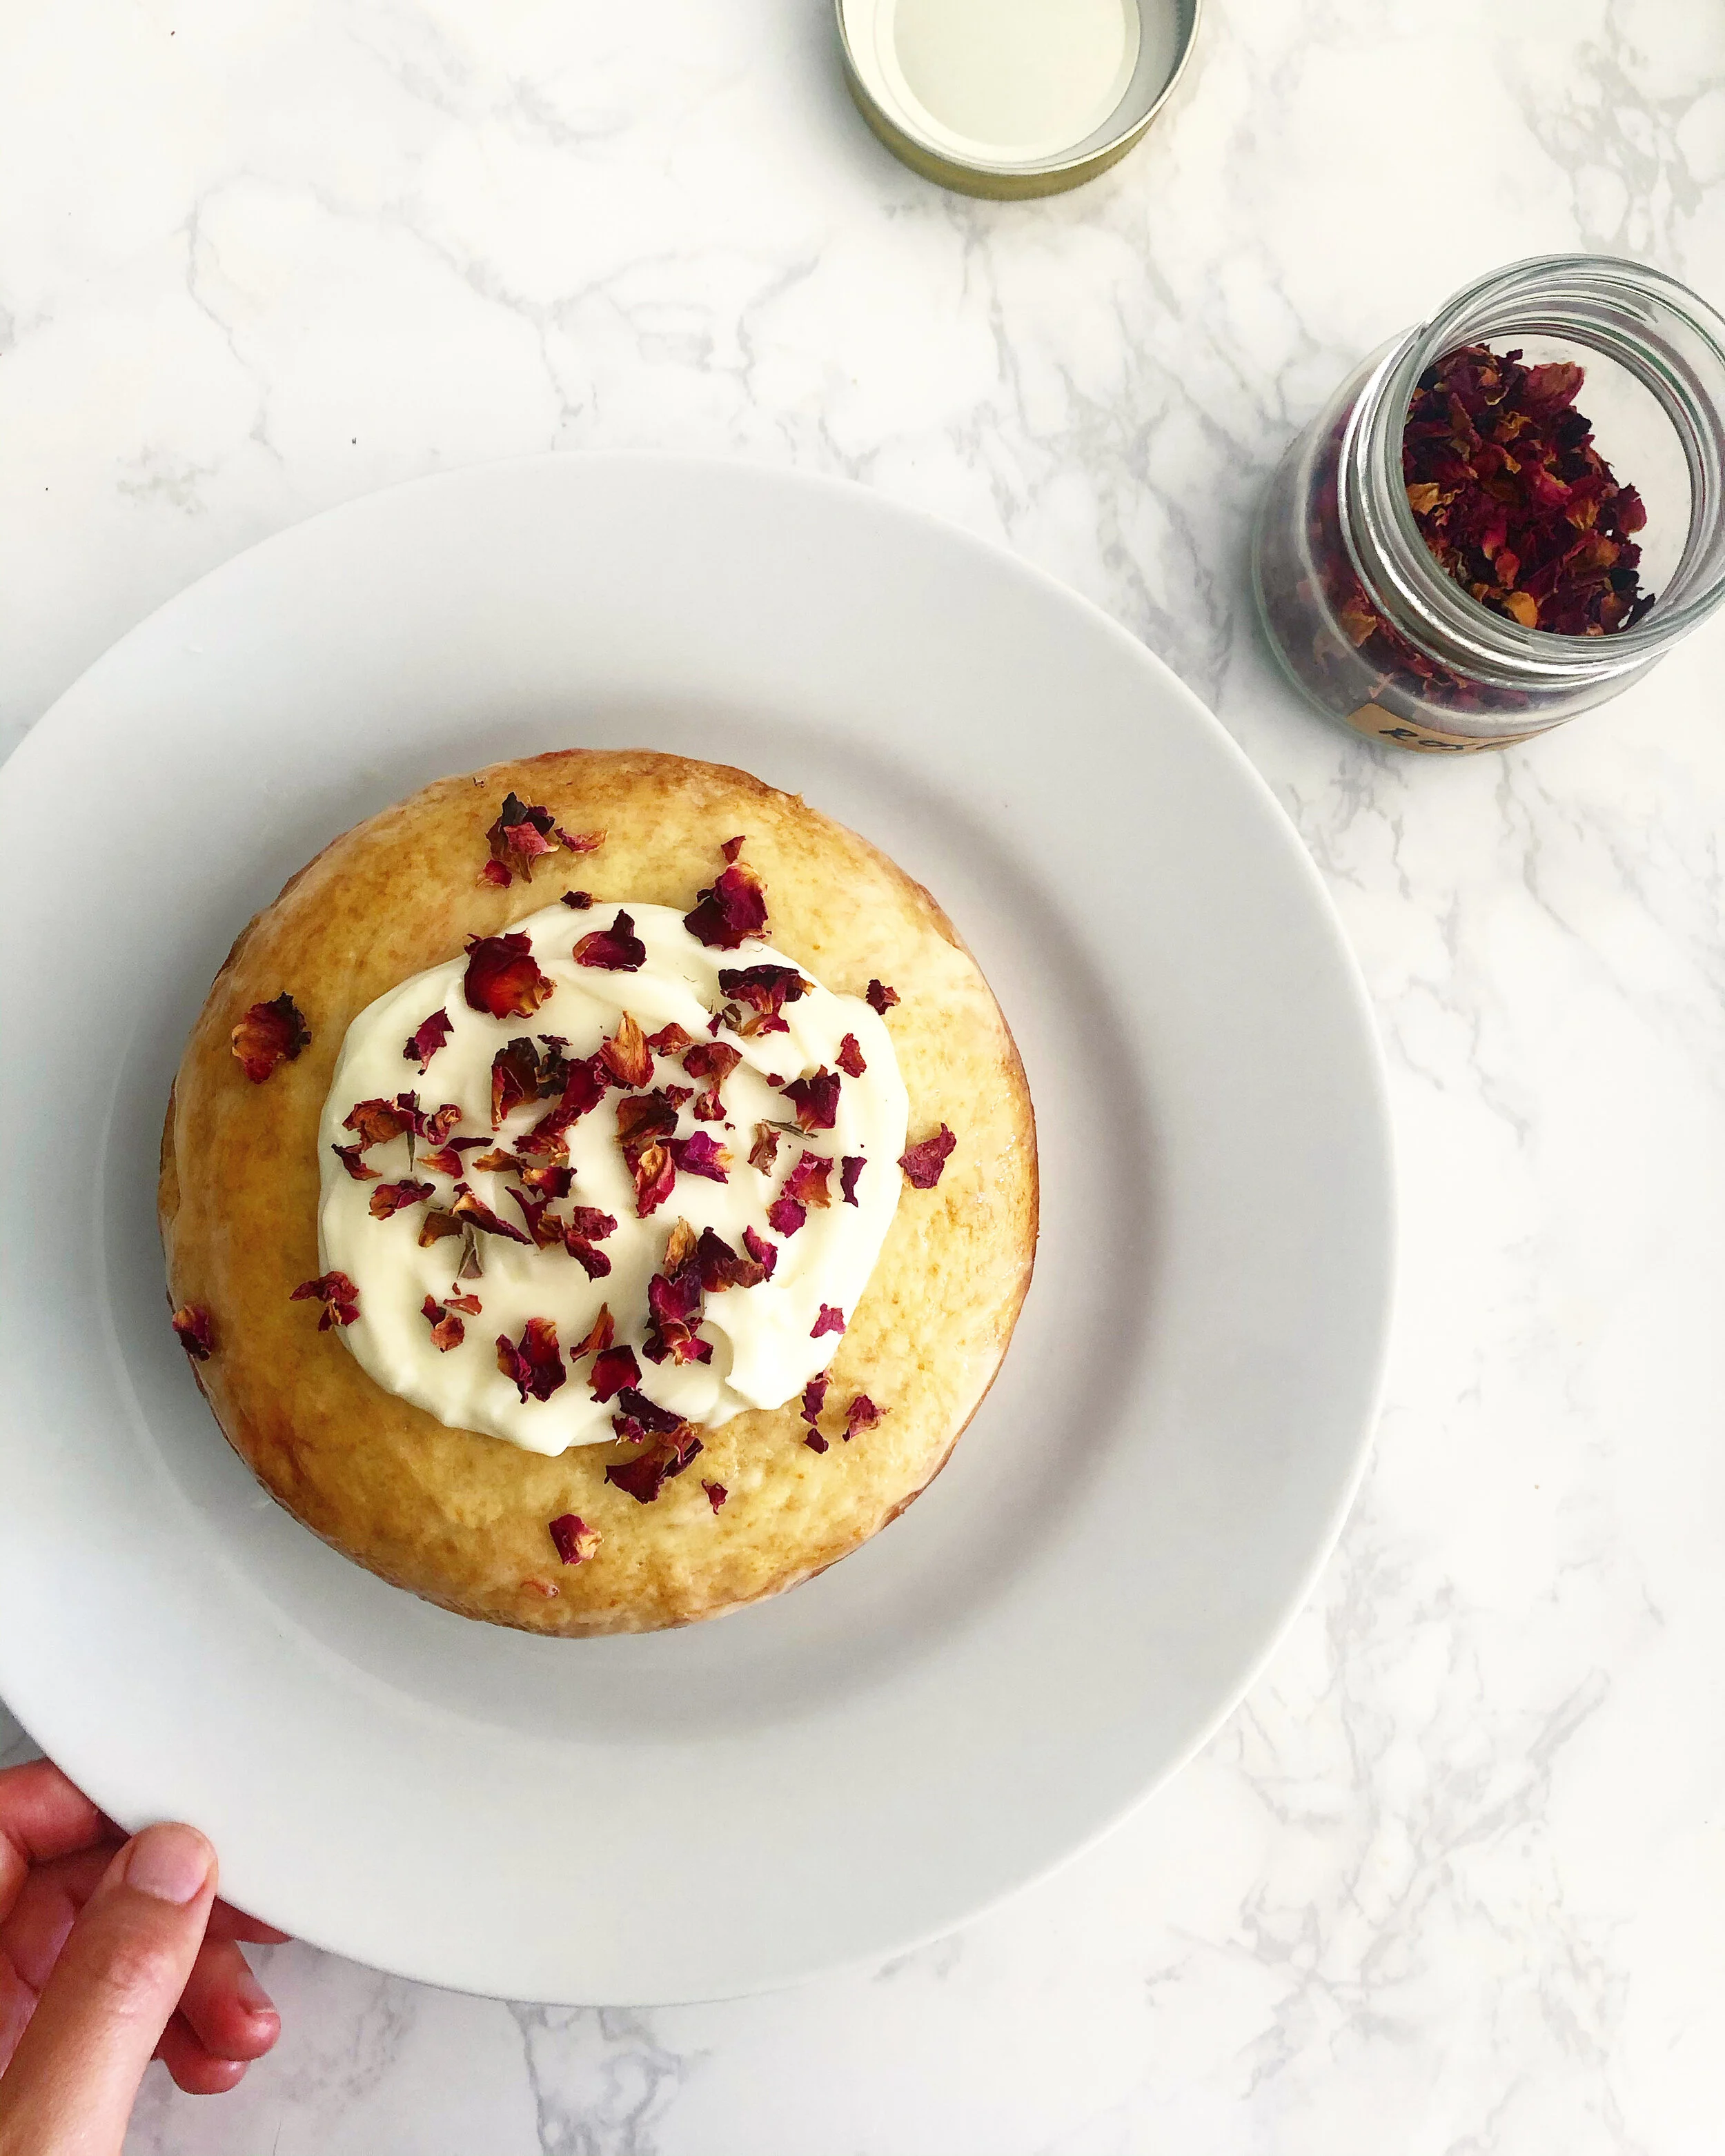
You absolutely won’t be able to believe that this glorious sponge is so quick as well as being dairy and egg free! For the filling I love the traditional Victoria Sponge combo of cream and strawberry jam but you can use creme fraiche or coconut yoghurt which I love swirled through with curd.

Preheat the oven to 180°C. Line two 15-cm bake tins with parchment paper and set aside.
In a large bowl mix together all the ingredients until you have a smooth batter. Divide evenly between the two tins and place in the oven for 20-25 minutes or until risen, golden and bounce back to the touch. Remove and place on a cooling rack. Once cool remove from the tins.
For the icing: whisk together the cream cheese + icing sugar until smooth.
To assemble: spoon the jam into the centre of one of the cakes and spread out but only halfway to the edge. Place the other cake ontop and press down lightly. Spoon the frosting onto the centre of the cake and again spread just halfway (see photo). Serve or sprinkle with whatever decorations you have- we used rose petals but some fresh berries, lemon zest or sprinkles would also be amazing. As with any light and fluffy sponges you need to eat within a couple of days but I assure you this won’t be a problem
Spiced Apple cake is one of my favourite cakes- I place it somewhere a little lower than carrot but on par with a chocolate brownie or a dense almond + citrus cake. I’d say it’s a bit of all-rounder in the cake department.... you can sometimes get away with having it for breakfast, it’s always great with a cup of tea and you can definitely have it warm from the oven as a comforting pudding!
This recipe is pretty versatile too. I use one cup of flour but what flour you use is completely up to you- plain will give you a lighter bouncy sponge, spelt a drier denser texture but a wonderful rich flavour and ground almonds will give you a dense but super moist cake. I generally use a mixture of all three - but go with whatever you prefer/ can get your hands on.
You can also vary the quantity of apple you grate into the batter- the more apple... the stickier and more pudding-like the texture.
Preheat the oven to 180°C and grease and line a 15cm cake tin with baking parchment. Set aside.
Add all the dry ingredients, including the apples, into a bowl. In a separate bowl whisk together the eggs, oil and syrup. Add the egg mix to the dry ingredients and fold in. Pour into your prepared cake tin. Arrange the apple slices ontop and drizzle with honey and cinnamon. Push the apple slices into the batter and then place in the oven for 30 minutes or until golden and risen. Allow to cool on a wire rack before turning out.
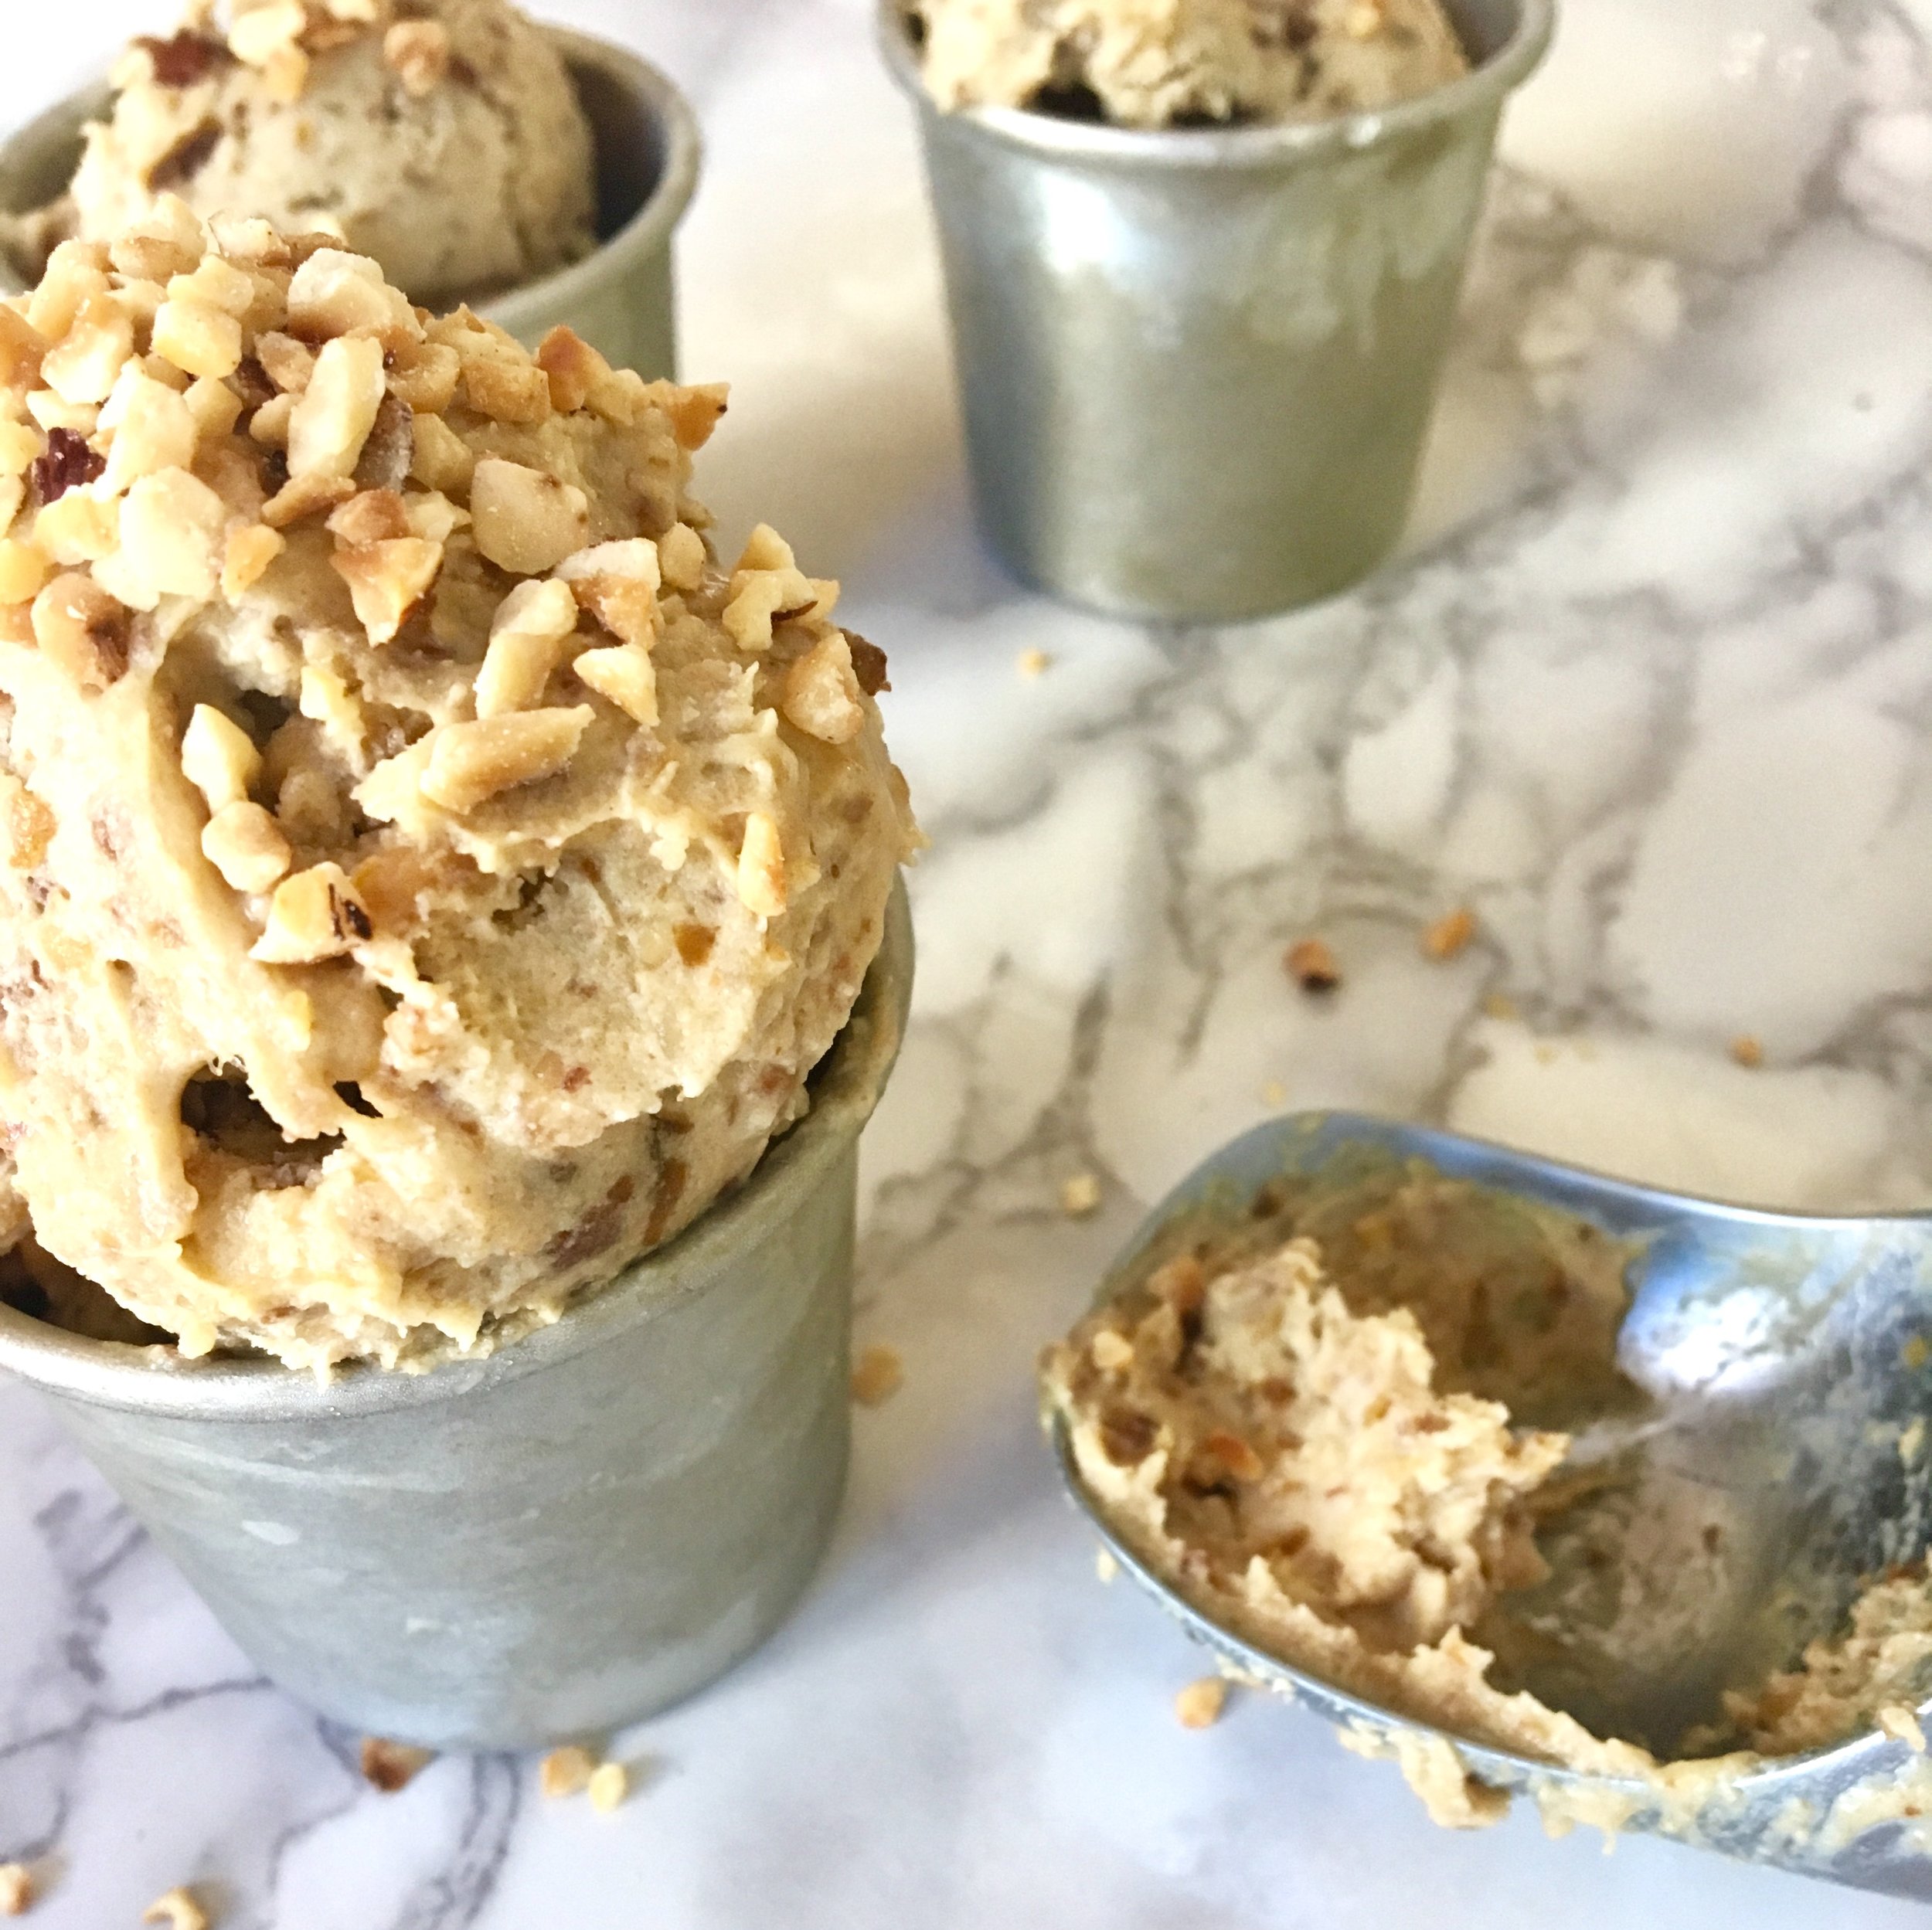
I have a complete soft spot for all things peanut so these are pretty divine in my book. My family also seem to share the obsession so I generally have to make a double batch.
They are great to make with kids and so convenient for post school snacks or when energy levels are running a bit low!
You can store them in the freezer and just take out and thaw for 10 minutes.
—————————————
Line a baking tray with baking parchment and set aside.
Put the almonds in your food processor and blitz for 1-2 minutes until ground down into a fine powder. Add the rest of the ingredients and continue to blitz for 3-4 minutes until you have a rough paste that sticks when you squeeze it together. Remove into a bowl and using a teaspoon portion into 8-10 truffle sized balls [Note: it can help to have slightly wet hands to mould the balls.] Place on the prepared baking sheet and cover with cling film before placing in the freezer for 2 hours to set. Remove and keep in the fridge or freezer.
This nut-free brittle is one of our favourite snacks. Its so easy to make and ridiculously delicious so don’t be put off by the ‘superfood’ ingredients. We eat it straight from the jar whenever we feel like a bit of sweet treat but you can also serve it alongside yoghurt or my chocolate pots for a healthier-than-your-average but totally-delicious dessert.
---------------------------------------------------
---------------------------------------------------
Preheat the oven to 180oC and line a large baking tray with baking parchment.
Mix all the ingredients together and ensure that everything is evenly coated.
Tip the mixture onto the prepared baking tray and spread into an even layer with a spatula. Make it as thin and even as possible (around the size of an A4 piece of paper) but also make sure there aren't any 'holes' in the layer. Place in the oven for 10 minutes before checking and rotating so that it cooks evenly. Cook for a further 6-8 minutes until golden brown. Remove and allow to cool completely before breaking into large shard. Store in an airtight container and snack as you please!
A good chocolate brownie recipe is something you want to cherish! I've been working on a recipe for the past 2 years and made a million versions that just weren't 'quite right.' However, I've finally stumbled on a recipe that gives just the right amount of gooey, chocolate-y squishy-ness. Not only is this recipe the best, its also dangerously quick to make, uses no refined sugar and is gluten free. As I said. Its a recipe to cherish.
---------------------------------------------------
---------------------------------------------------
Preheat the oven to 200oC.
Place the dark chocolate and butter in a heat proof bowl and melt over a saucepan of simmering water- stirring occasionally. Remove and set aside to cool for 5 minutes.
In a separate bowl, combine the almonds and maple syrup. Once cool add the chocolate mix followed by the egg. Pour into your prepared tray and place in the oven for 15minutes. Remove and allow to cool before placing in the fridge for 30 minutes before slicing up and serving.
This recipe is gold for a number of reasons- (1) you need only 4 ingredients; (2) it takes 5 minutes to make; (3) its nut free so perfect for nursery and school lunch boxes; (4) its refined sugar free; (5) it doesn't fall apart as soon as you cut into it; (6) it survives in your handbag for emergency snacking; (7) you can batch bake and freeze and finally (8) you can put a whole load of naughty toppings on if you so wish. In short, its a winner.
---------------------------------------------------

---------------------------------------------------
---------------------------------------------------
Preheat the oven to 180oC and have your foil tray or a greased baking tray prepared.
Place the butter, banana and maple syrup in a pan over a medium heat and cook until the butter has melted. Mash the banana down as you go and once everything starts to bubble take it off the heat. You'll have something that smells like banana caramel!
Meanwhile, put half the oats in a food processor and blitz down for 30 seconds until slightly broken down. Add the banana caramel and blitz again for 10 seconds. Finally, add the remaining oats and blitz for 10 seconds before spooning into your foil tray, or greased baking dish.
Place in the oven for 20 minutes (rotate after 10 minutes). Remove and allow to cool completely before cutting- I normally allow it to firm up in the fridge for at least 3 hours. Now add any toppings!
This maybe one of the most delicious things I have ever tasted and its crazy how simple it is to make- 5 minutes from blender to freezer. Our family are complete peanut butter addicts so you can imagine how long a batch of this stays in the freezer. Choose crunchy or smooth peanut butter depending on your preference-or make your own. Its amazing either way. Serve with extra roasted peanuts scattered on top.
Makes 3-4 servings
1 x 160ml tin coconut cream, keep in the fridge and use cold
150g pitted and roughly chopped dates
2 tbsp peanut butter
Place the dates in a food processor and blitz for 2 minutes until you have a date paste (buy the best quality dates you can- it makes a huge difference as cheap dates will never go down to a nice paste). Add the coconut cream and peanut butter and continue to blitz until light and fluffy. Remove and place into a freezer-proof dish and freeze for at least 4 hours.
It's almost dangerous that these chocolate pots are so easy to make (literally 5 minutes and from only 4 store-cupboard ingredients too!). They are also fantastic from the freezer as a no-churn ice cream which makes them brilliant for last minute playdate desserts or when everyone needs a bit of an afternoon energy boost - mummy included!
Note: add more cocoa for a richer flavour but I find my daughter favours this creamier version.
Makes 4 pots
300ml cold coconut cream (it needs to be the cream and not milk)
2 tbsp cocoa
2 tbsp agave syrup
1 tsp vanilla paste
Place the coconut cream in the fridge for an hour before using to make sure it is as solid as possible. Once ready, place all the ingredients in a bowl and, using an electric whisk, whisk for 5 minutes until light and fluffy [Note: do not whisk for longer as the mixture will become watery].
Divide between ramekins and place in the freezer for at least 2 hours. Remove 30-40minutes before serving to allow it to soften if you want a mousse texture or 20 minutes for ice cream.
These crisps are such a fantastic snack to have handy anytime of the day and and are perfect in lunchboxes! As with my sweet potato crisps the key is getting the slices thin and consistent and although they take a while in the oven you can really leave them to it!
[Note: you can make the batch as big as possible but the slices do need to be laid out in an even layer otherwise they will not crisp up]
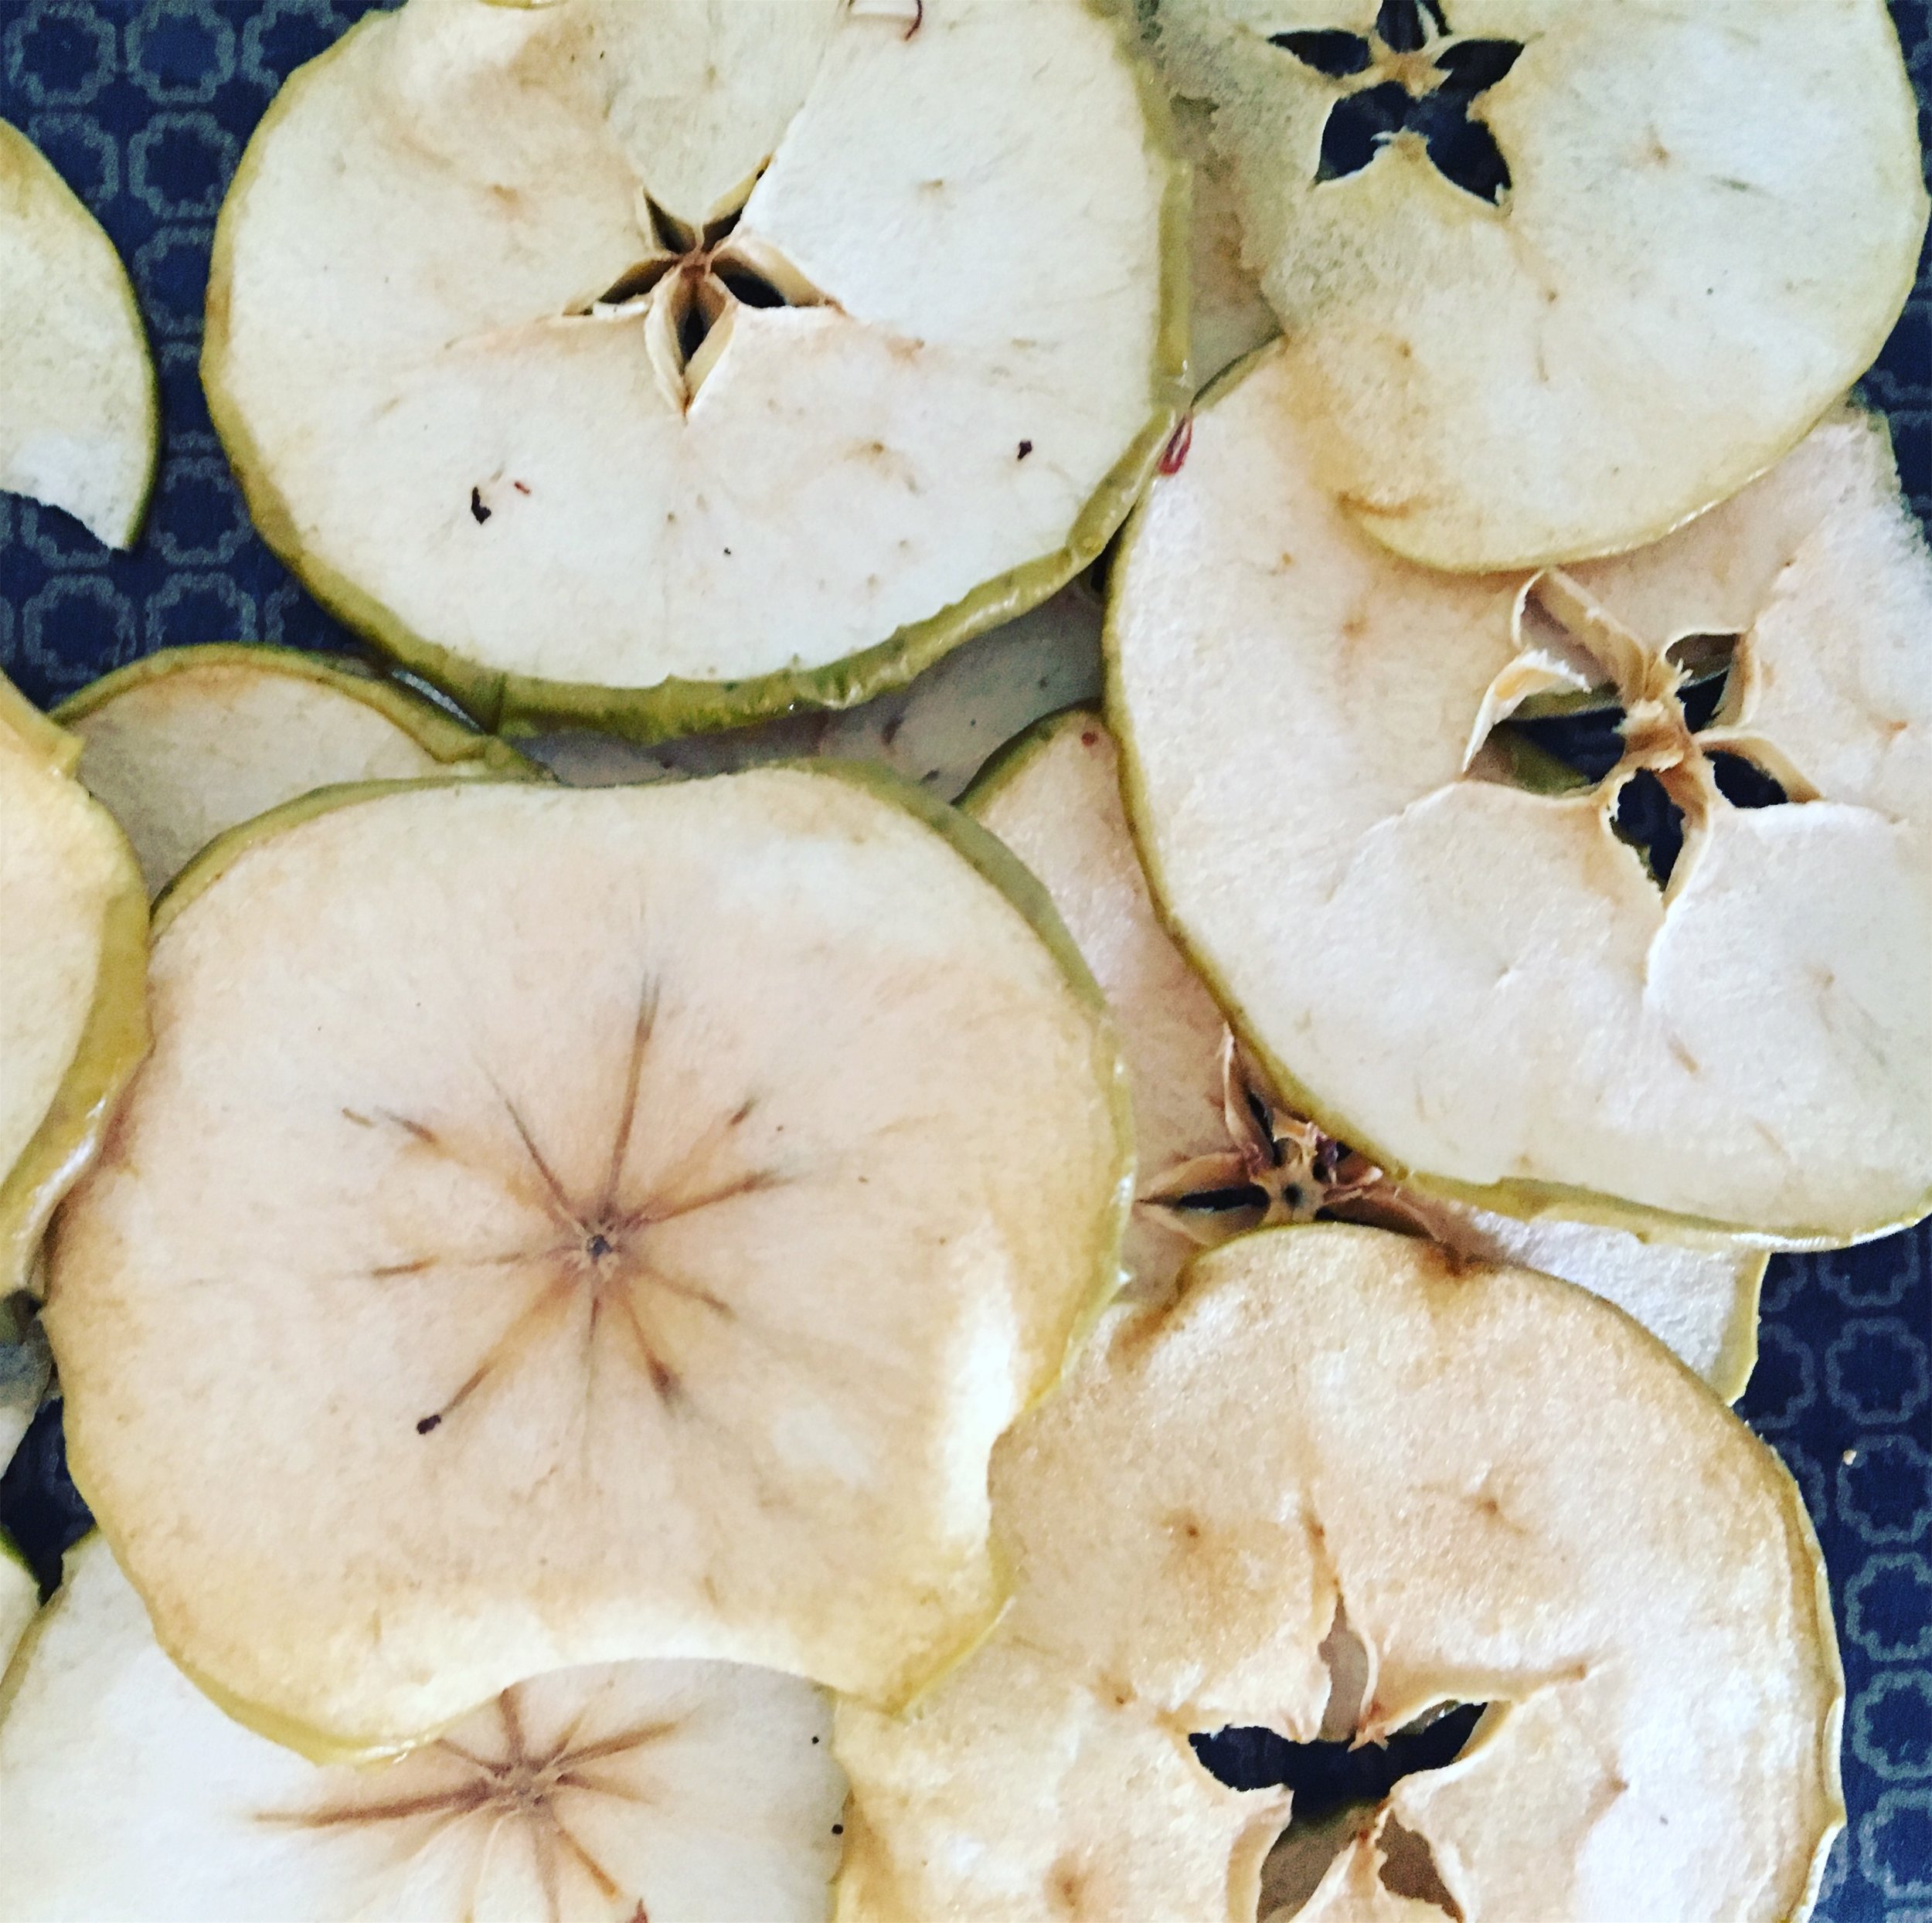
1 large apple
1 tsp agave syrup
Preheat your oven to 70oC and line a baking sheet with parchment.
Slice the apple as thinly as possible and then spread out in one layer on the baking tray. Dip a pastry brush into the agave syrup and lightly brush each apple slice on both sides before placing in the oven for two hours.
After two hours flip each of the slices and turn off the oven. Leave the tray in the oven overnight to continue to crisp up. Remove and store in an airtight container for 3-4 days.
My daughter has quite a sweet tooth so these are great for a slightly healthier sweet treat plus unlike most 'energy balls' these are also nut free which makes them perfect for nursery/school lunches.
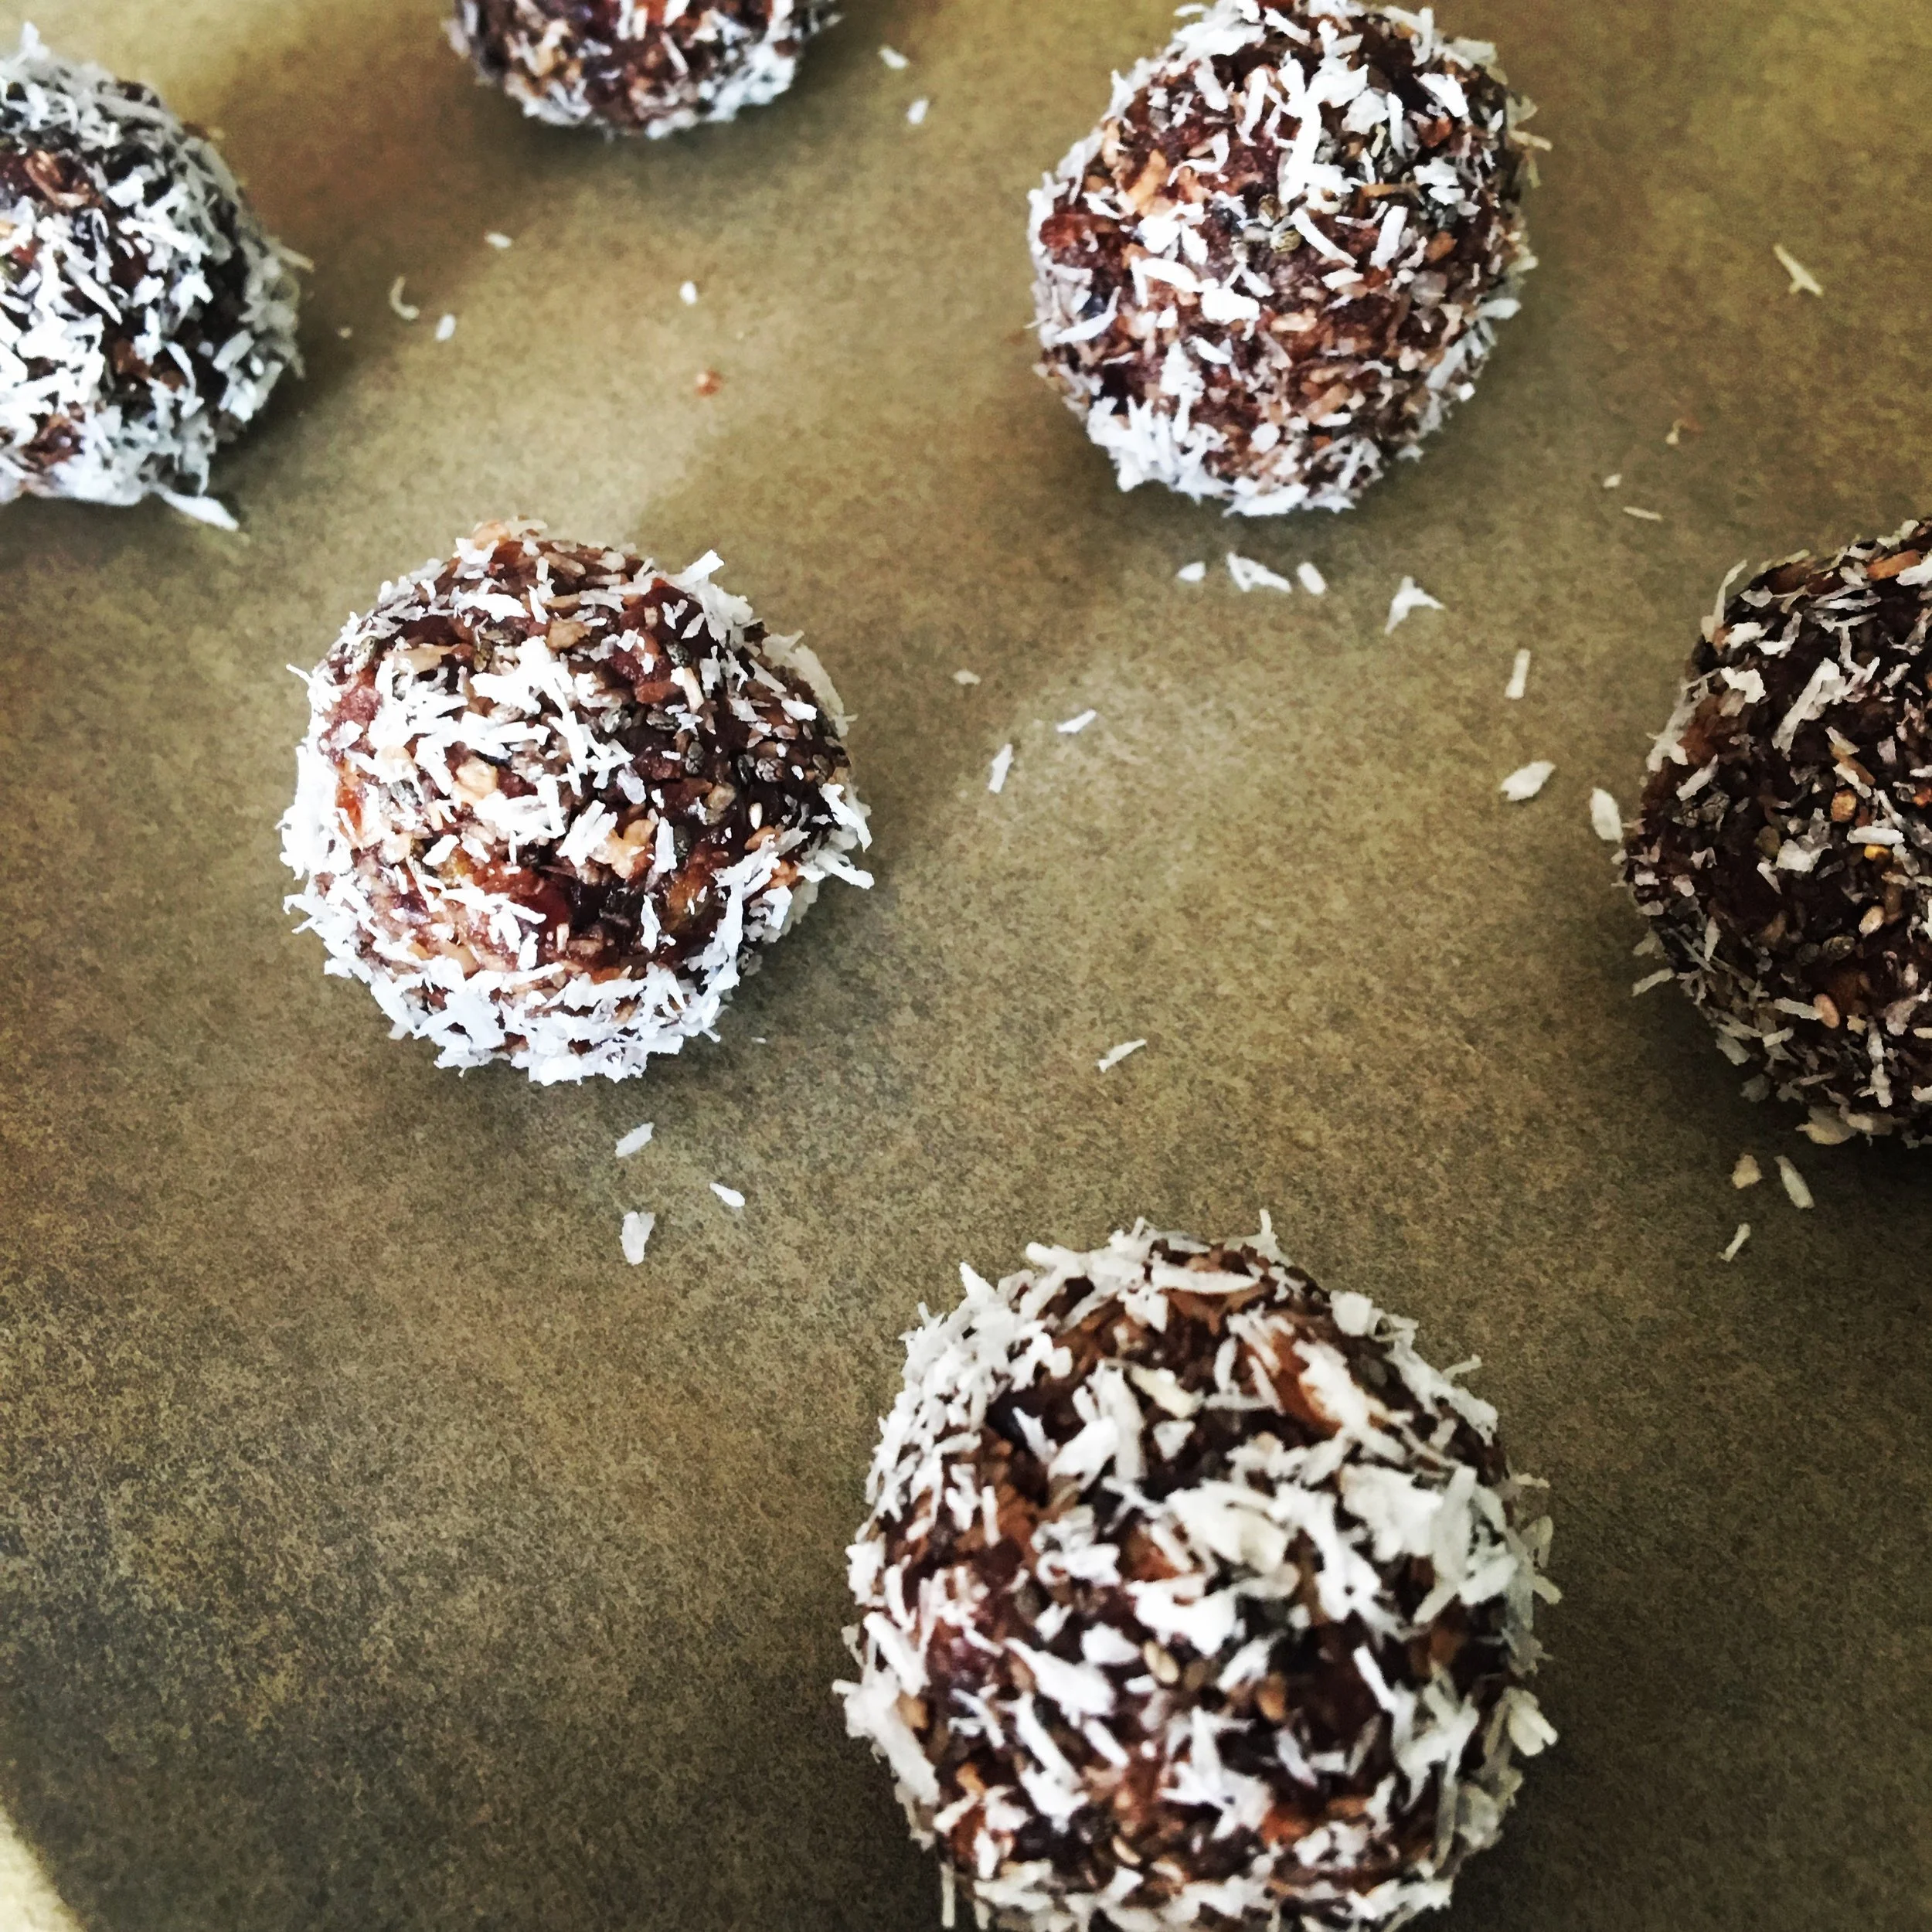
Makes 8-10 truffle sized balls
100g dates, pitted and roughly chopped
4tsp coconut oil
40g desiccated coconut plus 10g for coating
2tsp unsweetened cocoa
2tsp chia
Line a baking tray with baking parchment and set aside.
Put the dates and coconut oil into your food processor and blitz for 1-2minutes or until broken down into very small pieces. Add the desiccated coconut, cocoa and chia seeds and blitz for a further 2-3minutes or until you have a rough paste that sticks when you squeeze it together. Remove into a bowl and using a teaspoon portion into 8 truffle sized balls [Note: it can help to have slightly wet hands to mould the balls]
Put the remaining 10g of coconut in a small bowl and roll each ball to get a light coating. Place on the baking sheet and cover with cling film before placing in the freezer for 2 hours to set. Remove and keep in the fridge.
These biscuits are fantastic for sore gums as they can be stored in the freezer and given straight to your little one to help soothe angry gums! It obviously helps that they are also absolutely delicious and the perfect size for little hands to pick up and feed themselves. f you don't want to add any sweetener then you can just leave out the agave nectar.

1 1/2 tsp olive oil
1/2 tsp mixed spice
75g banana, cut into rough chunks
75g dates, destoned and roughly chopped
125g plain flour
100g porridge oats
125ml milk
2 tbsp agave nectar, optional
Preheat the oven to 200oC.Add the dates into the food processor and blitz down into small pieces. Add the banana and continue to blitz for 1-2 minutes until you have a puree and the majority of the dates have been broken down and the banana is liquid. Now add all the rest of the ingredients and bring the mix together into a wet dough. Remove the mixture into a piping bag. Cut a 1-cm hole in the end of the piping bag and, using a non-sticking baking tray, pipe your biscuits- about 5-cm long and then place in the fridge for 10 minutes to harden a little.
Remove and place in the preheated oven for 12-15 minutes -they will still be a little soft when you remove them but will set up whilst cooling. Place onto a wire cooling rack and then pop into a freezer bag and freeze. Defrost as required.
This recipe really couldn't be easier and it is fantastic as a quick, sweet treat for adults and kids. There is no added sugar but dates are full of natural sugars so it doesn't need any help there! If you are worried about nut allergies simply substitute the pecans for more oats- it will just take a minute longer in the food processor.
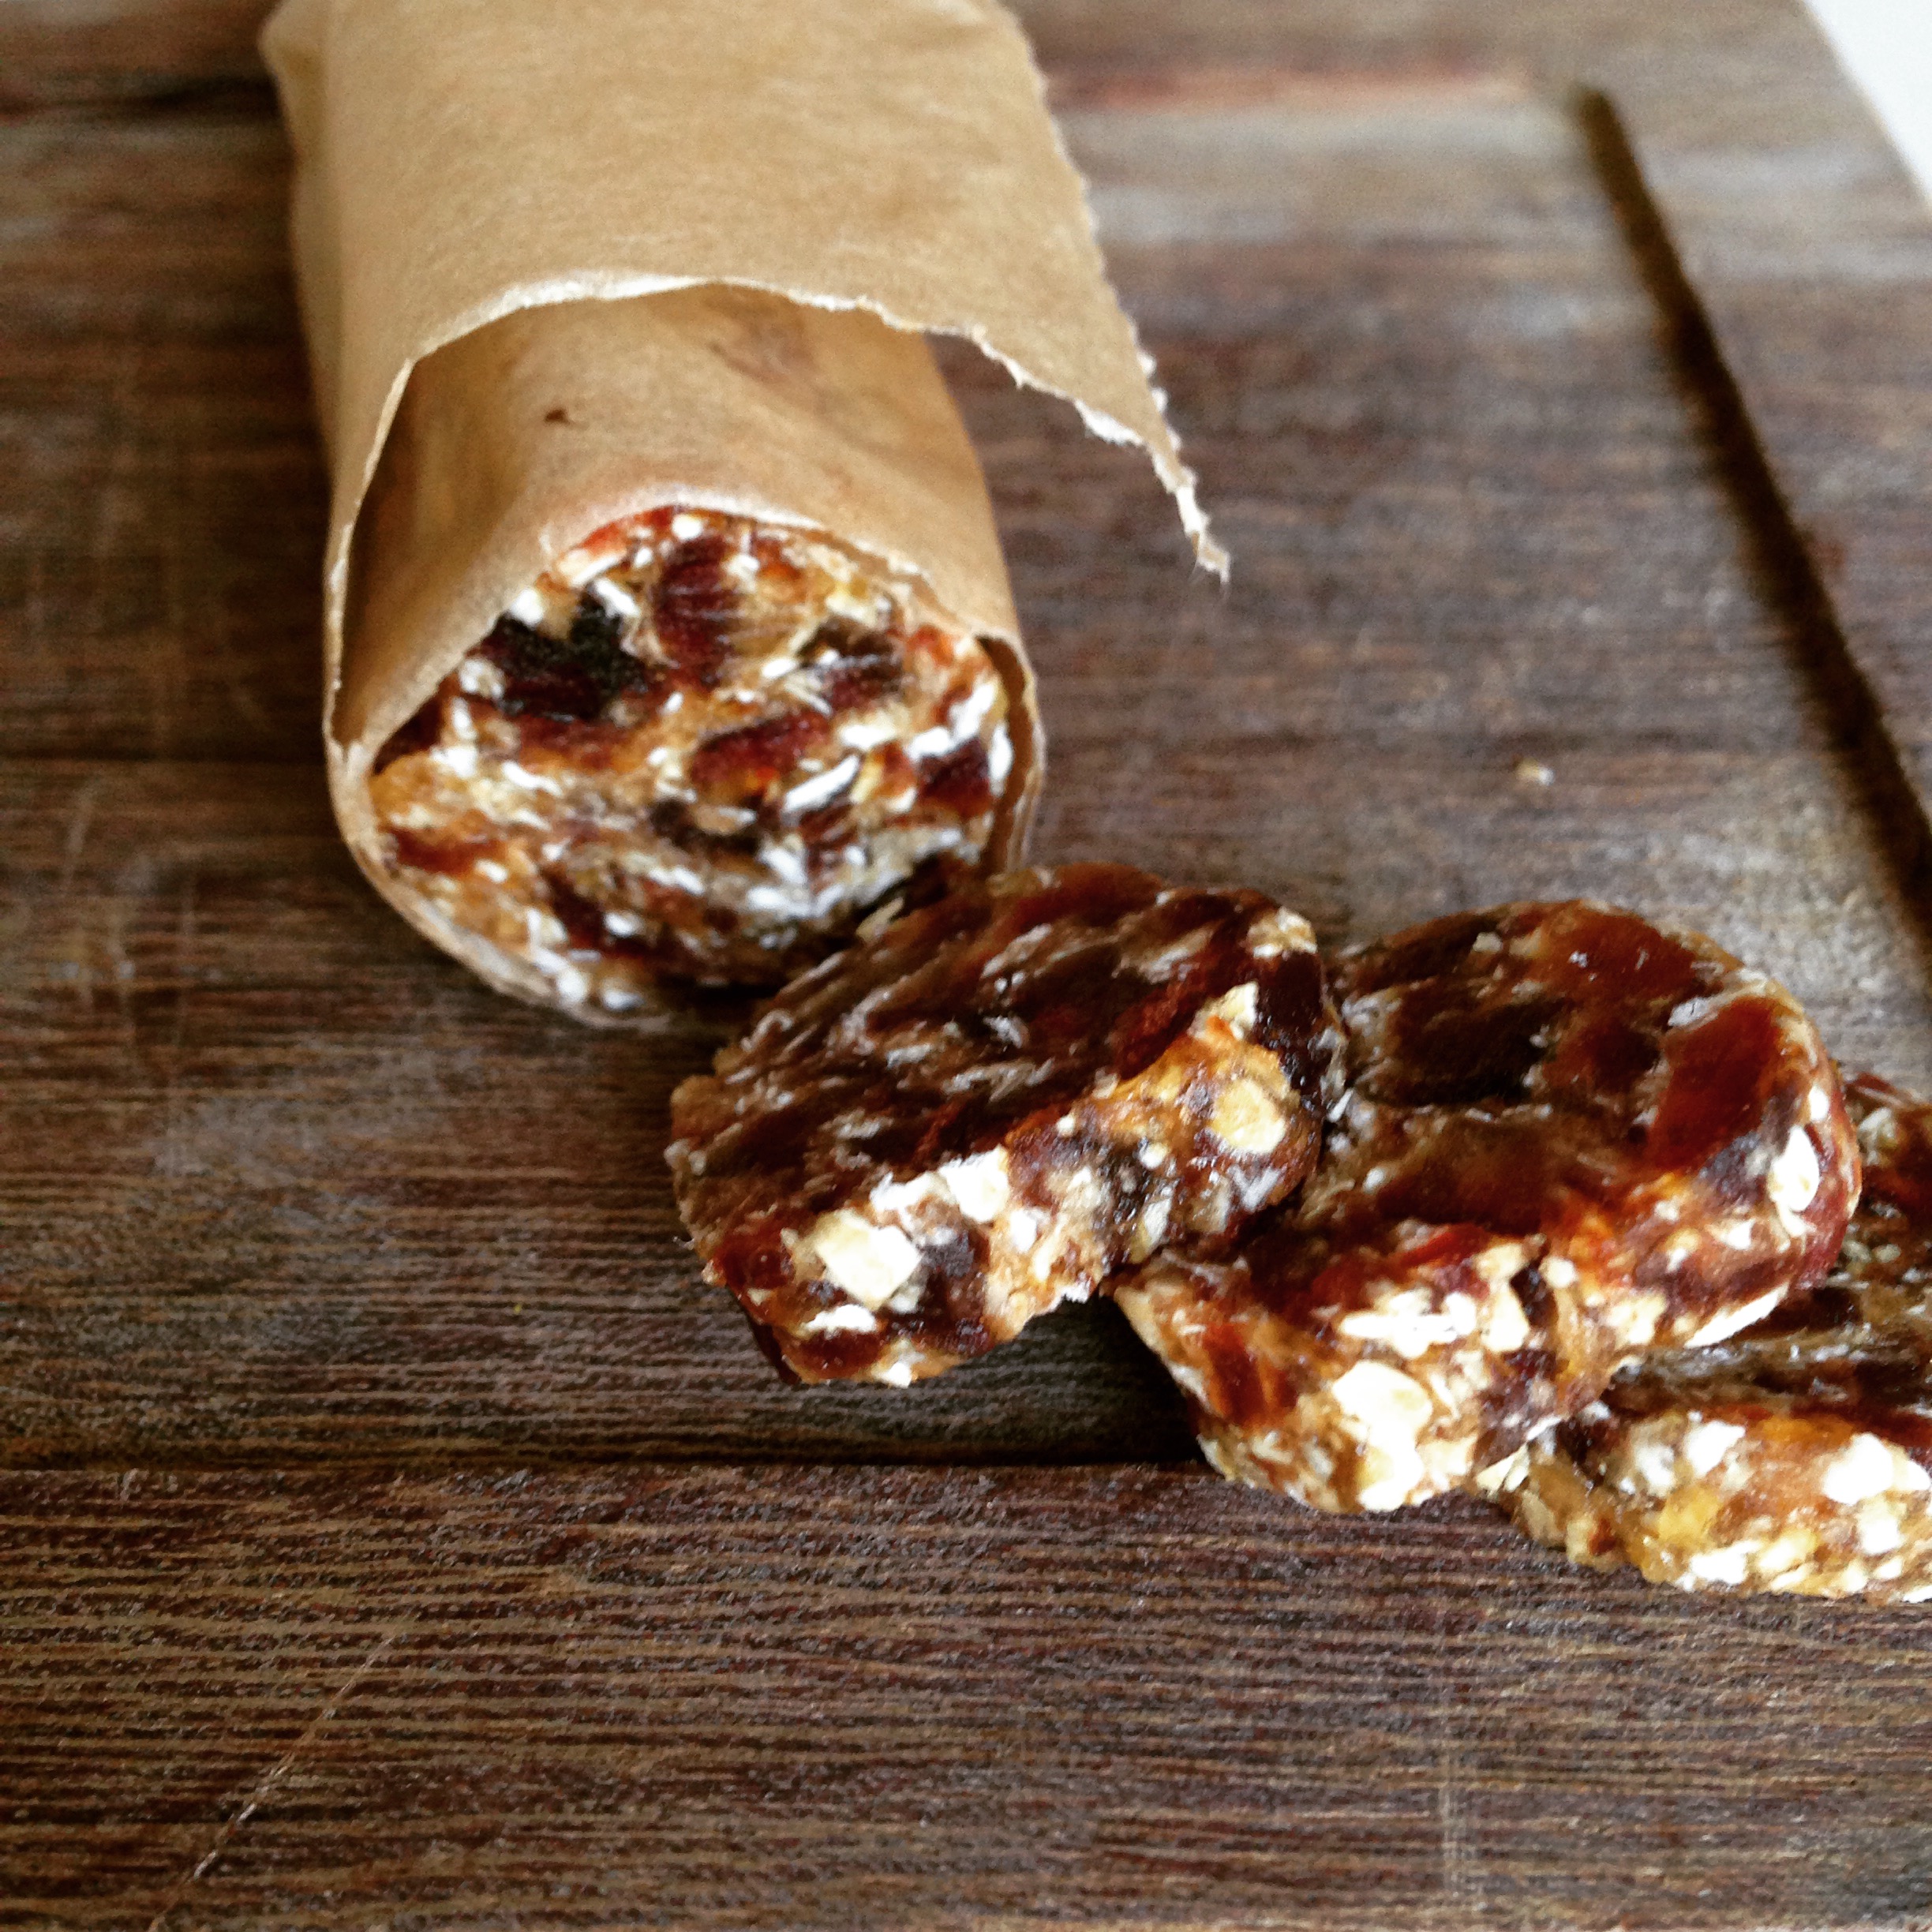

100g dates, destoned and roughly chopped
50g porridge oats
25g pecan nuts
25g dried apple
2 tbsp coconut oil
1/4 tsp ground cinnamon
Place all the ingredients in a food processor and blitz down for 3-4 minutes until you have a rough looking cookie dough - you will still be able to see oats but it should easily stick together.
Remove onto a piece of baking parchment and mould into a long sausage to the bottom half of the sheet. Roll up the parchment to make a tight sausage shape and twirl the edges like a giant sweet wrapper.
Place in the freezer for 2 hours and then just slice up as and when you want some. You can store in the freezer as the sugars in the dates will prevent it from freezing solid.
The fresh mango in these super nutritious bars make them utterly addictive for both adults and children. You can vary the nuts/seeds that you use according to preference or whatever you have in your cupboard and if you can't find 'popped' quinoa in your local shop then you can easily substitute porridge oats (use 60g) but I love the texture of the quinoa, as does my daughter!
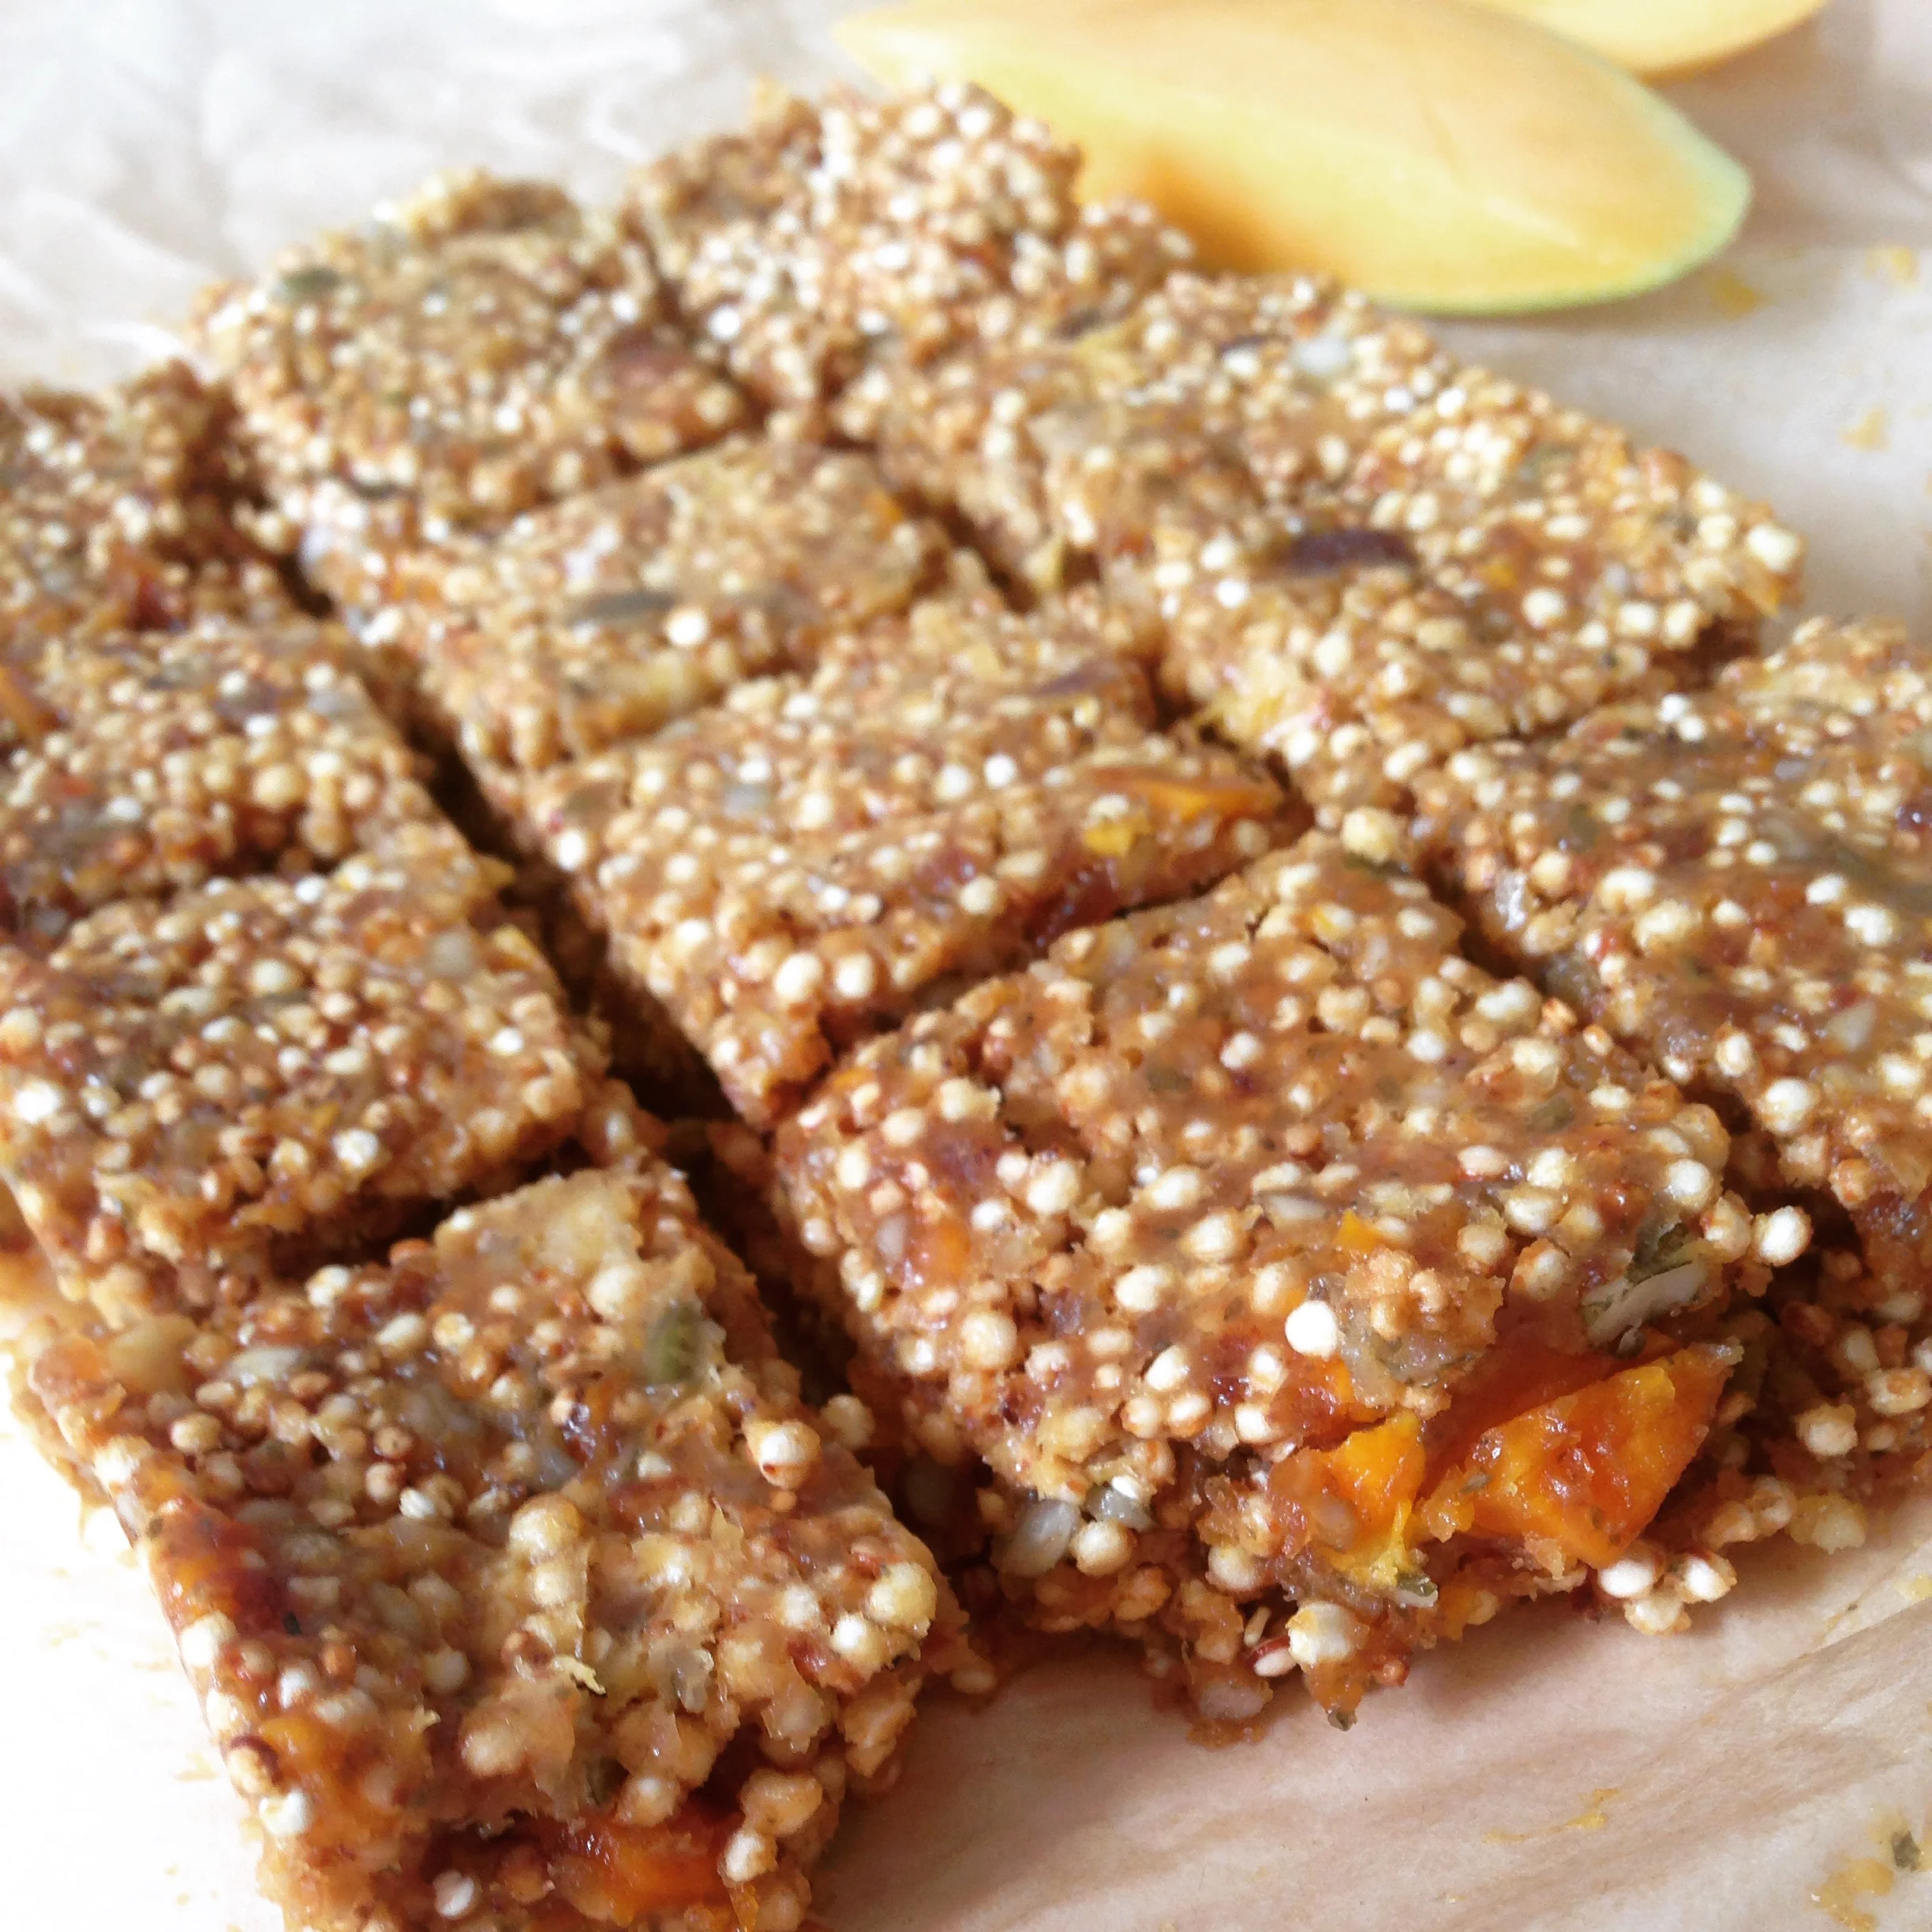

Makes 12 squares
15g almonds
30g sunflower seeds
1 tbsp coconut oil
60g peanut (or other nut) butter
30g dates, roughly chopped
30g dried mango, roughly chopped
90g fresh mango, roughly chopped
40g puffed quinoa
Line a medium tupperware or baking dish (around 15 x 10cm or similar) with baking parchment and set aside.
Place the almonds and sunflower seeds in a food processor and blitz until roughly broken down. Add the remaining ingredients, apart from the quinoa, and continue to blitz until the mixture comes together like a cookie dough. Remove and carefully stir through the puffed quinoa until coated.
Press down the mixture into the prepared dish with a spatula or the back of a spoon until evenly spread. Place in the refrigerator for a couple of hours or until set. Remove and slice into squares.
Cookies are phenomenally tricky to get right- they need to be soft, chewy and never, ever hard. These bizarre sounding cookies deliver all of the above and, even better, they are great for any little ones who are gluten intolerant or just aren't too keen on protein as they are primarily made from chickpeas and peanuts. The chickpeas provide a fantastic 'cookie' texture and a wonderful wholesome and altogether addictive flavour. I generally split the batch and make half oat & raisin and half chocolate chip but feel free to make the whole batch one or other instead.
[Note: use organic chickpeas if you can as these are beautifully plump and give a much better final texture].
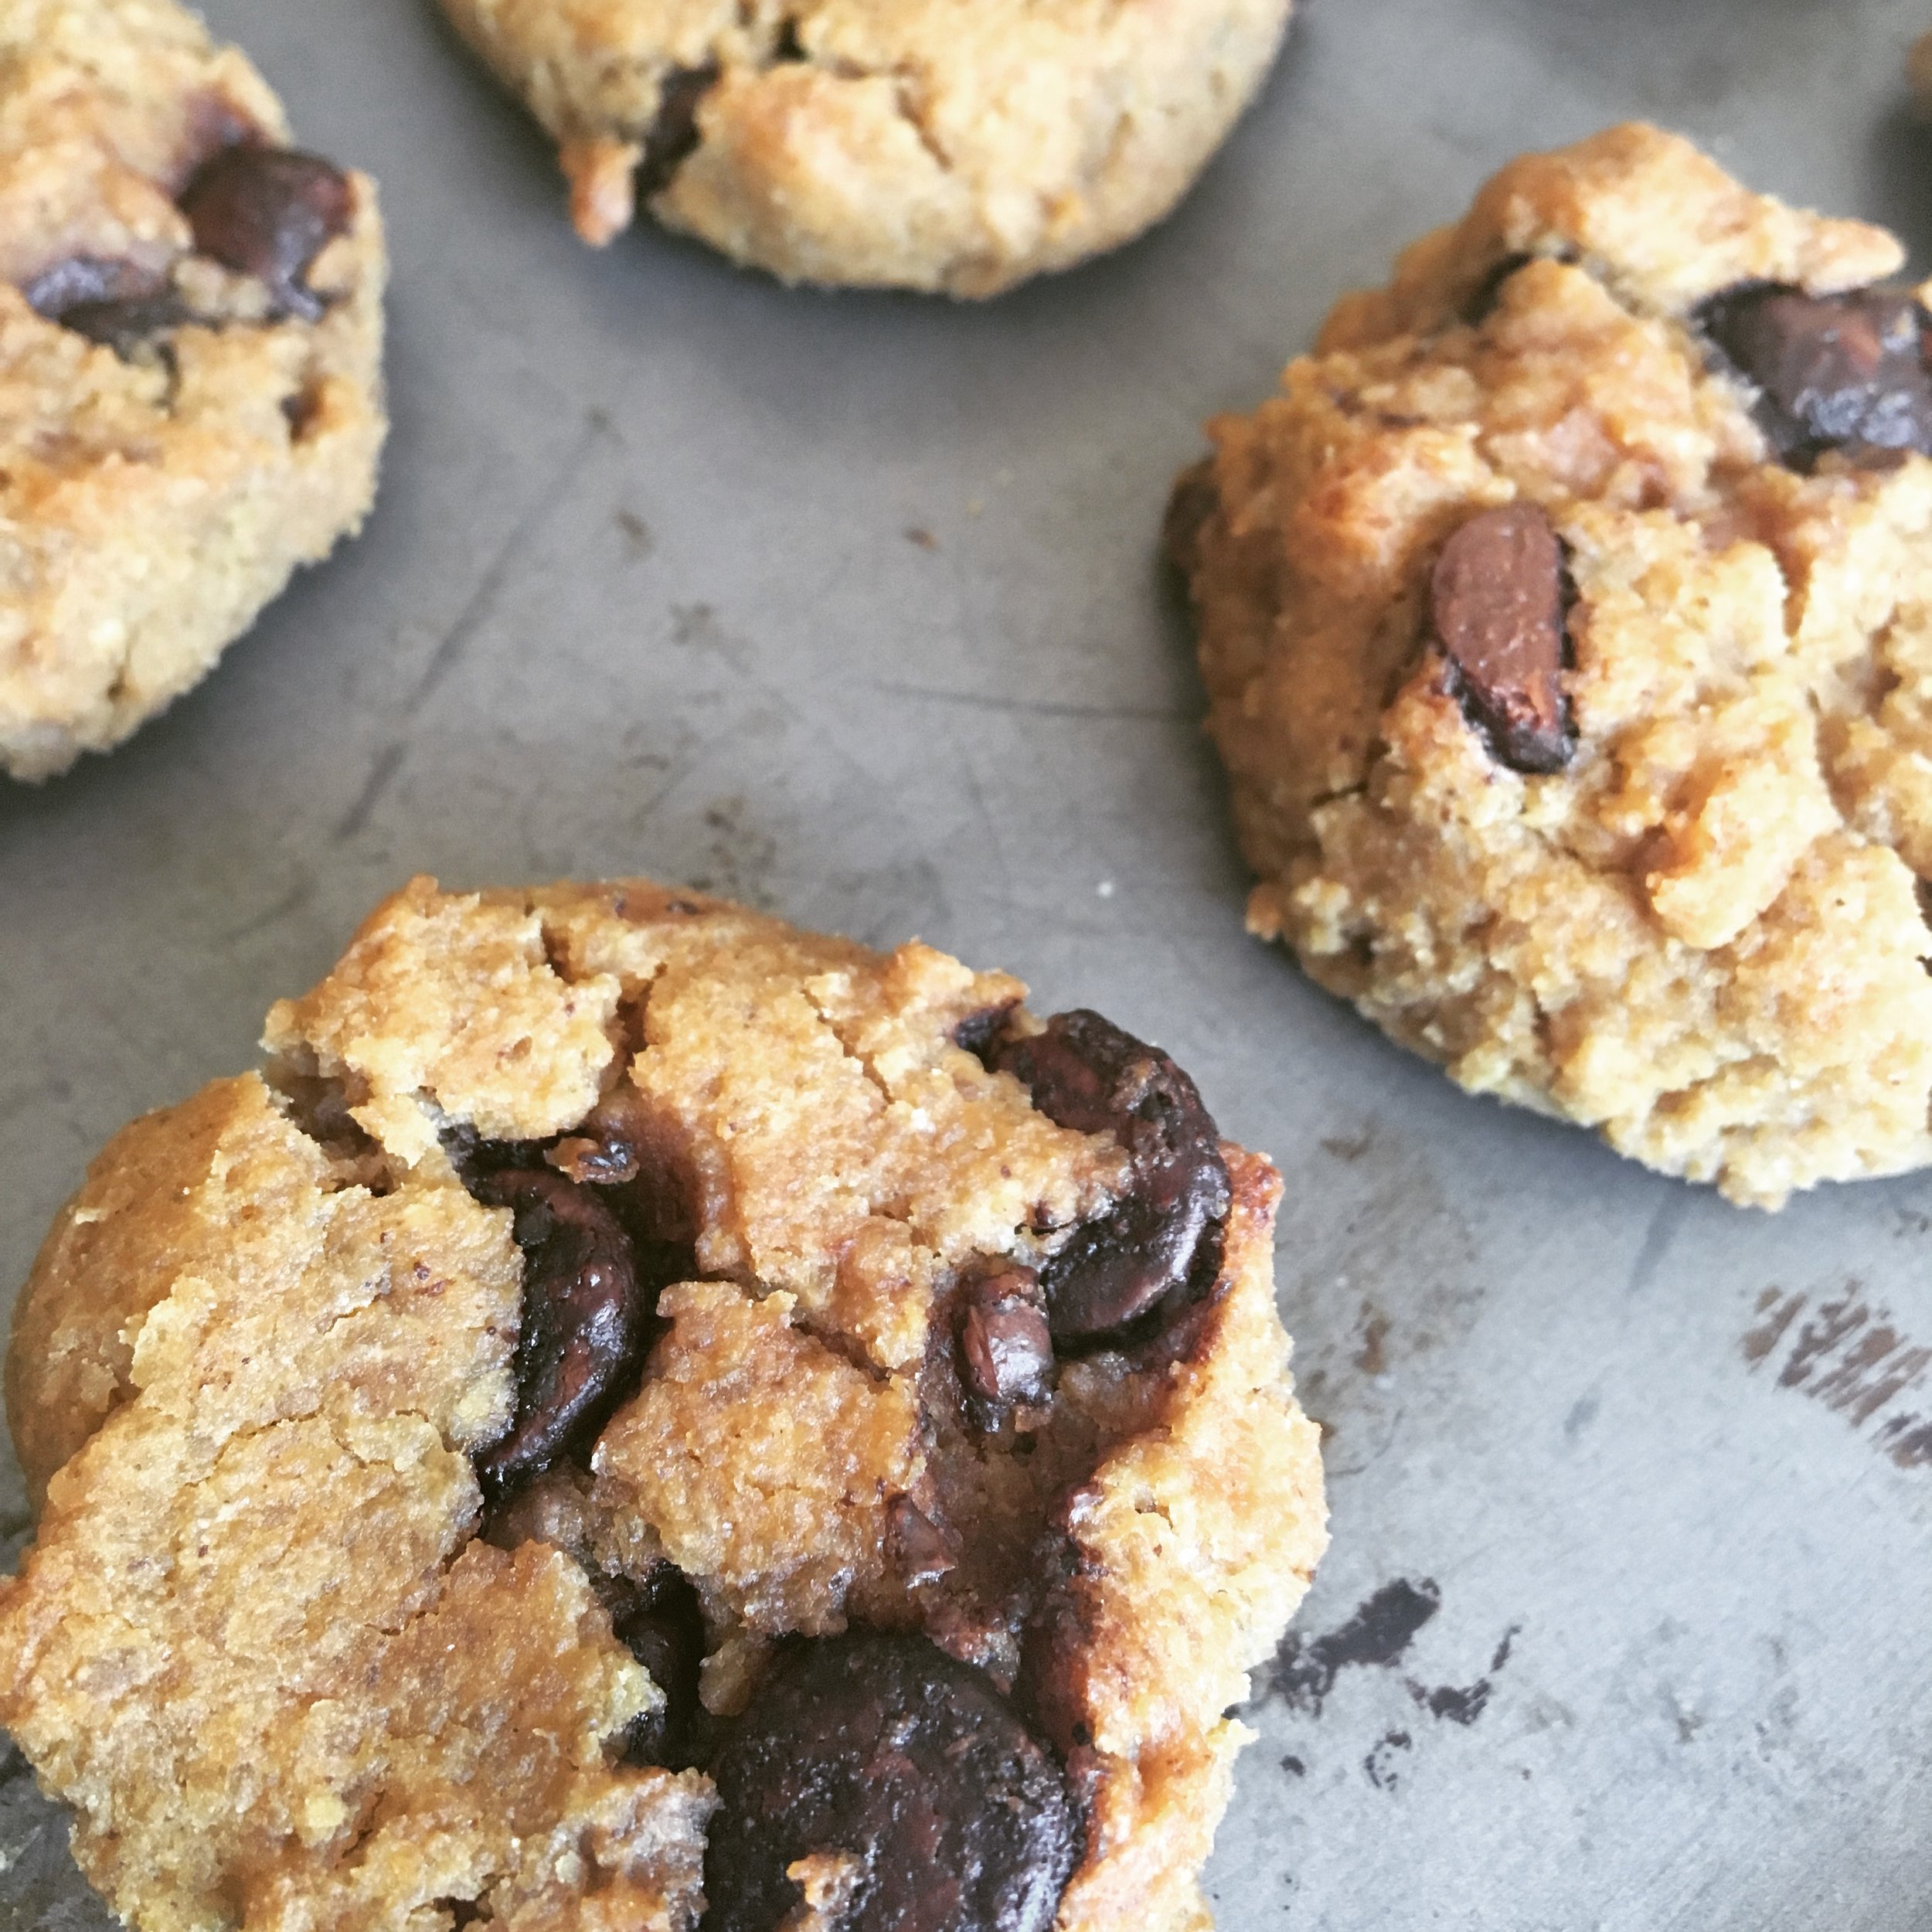

Makes 14 cookies in total
1x400g tin chickpeas, preferably organic
3 tbsp peanut butter
3 tbsp maple syrup
1 tsp bicarbonate of soda
for one half: 2 tbsp raisins
1 tbsp oats
for the other half: 2 heaped tbsp dark chocolate chips
Preheat your oven to 200oC and line a large, flat baking tray with baking parchment.
Place the chickpeas, peanut butter, maple syrup and bicarbonate of soda in a food processor and blitz for 30 seconds until you have a rough paste. Remove and, if splitting, divide equally into two mixing bowls. Add your topping(s). Mix to combine. To assemble: place the mixture(s) on top of a piece of baking parchment or clingfilm and roll carefully into logs about 15-cm long. Place in the freezer to firm up for 20minutes- 1 hour.
Once ready, remove and slice into 2-cm rounds before placing on the prepared baking tray and gently pushing down. Place in the oven for 12-15 minutes. Remove and allow to sit on the baking tray for 5 minutes before transferring to a wire cooling rack. Store in an airtight container for a week or freeze and use within a month.
I’ve had a lot of requests for a nut free lunchbox friendly flapjack and after playing around for a while and having the hard task of sampling all the recipes Madeleine and I have decided that this is by far the yummiest flapjack we’ve tasted! Its crammed full of seeds, dried fruit and oats with a good dose of honey for sweetness. You can vary the dried fruit but we’ve experimented quite a bit and this combo really is the best!
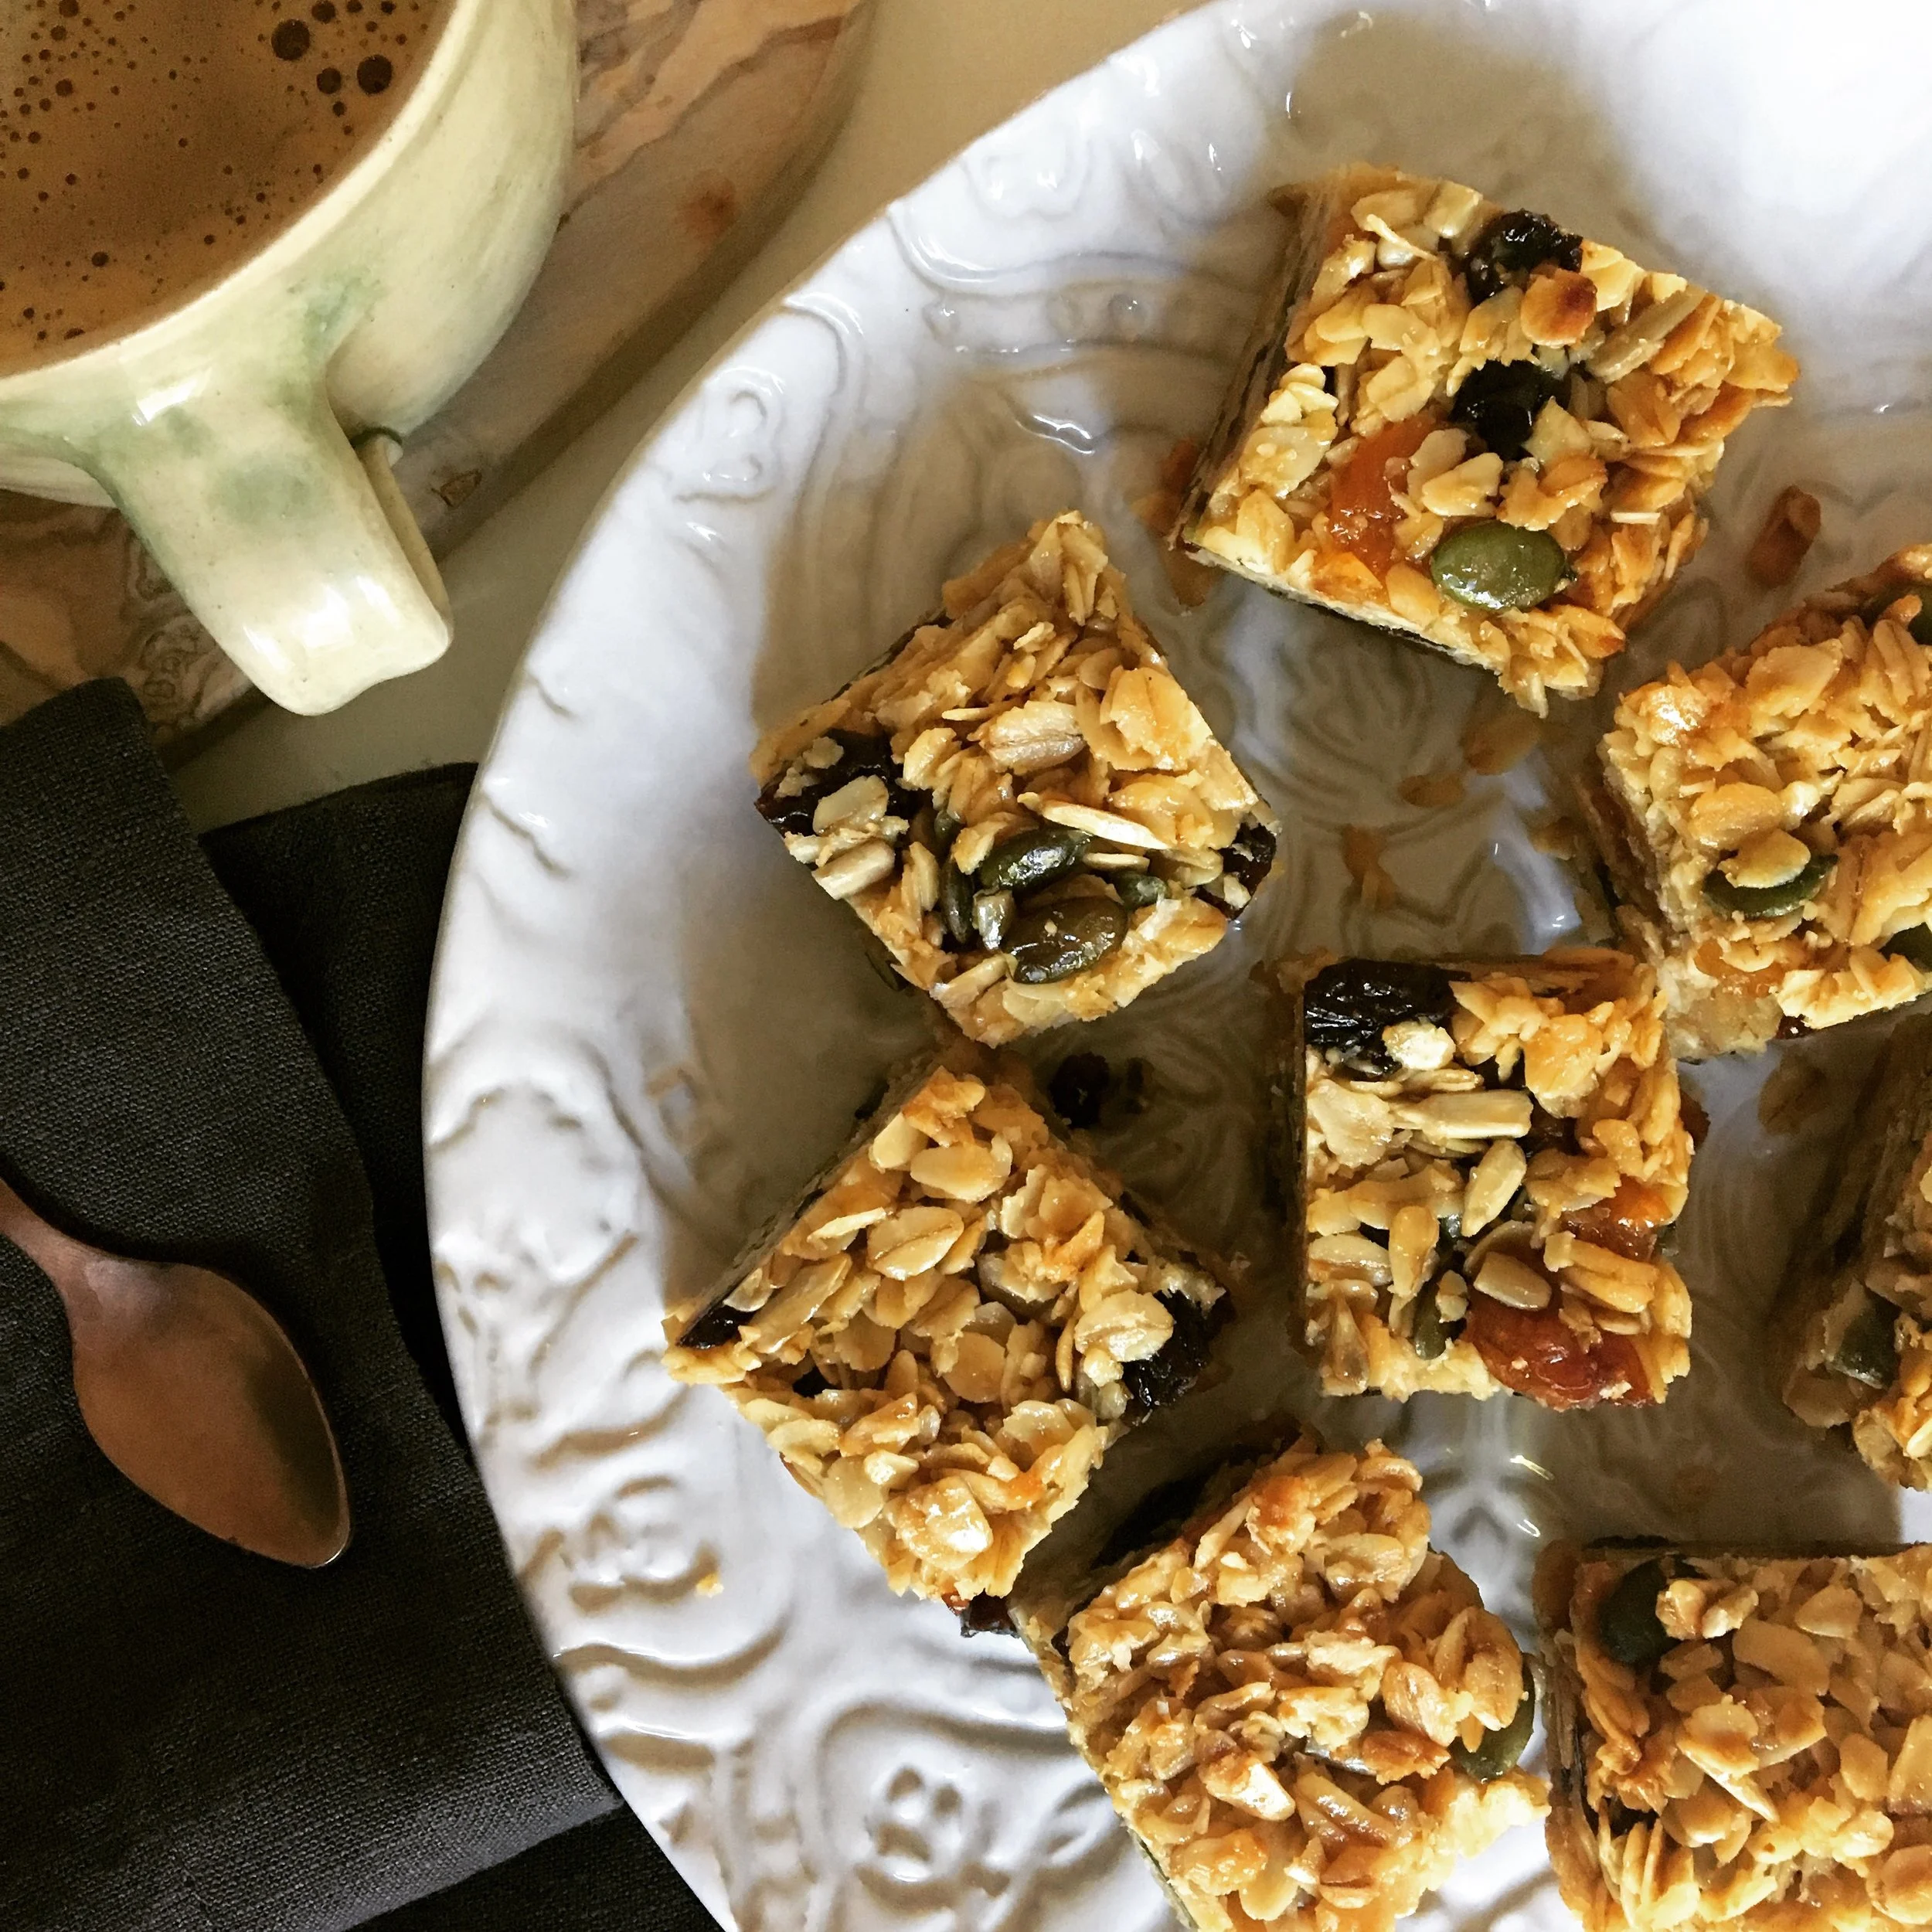
Makes 12 small squares
125g unsalted butter
125g honey
25g sunflower seeds
25g pumpkin seeds
30g organic dried apricots, cut into raisin size dice
30g raisins
30g sour cherries, roughly chopped
175g porridge oats
Preheat the oven to 150oC and line a small ovenproof dish with foil, making sure that there is enough extra foil to fold over the flapjack once cool.
Melt the butter and honey in a small saucepan. Add the rest of the ingredients and stir to combine. Pour the mixture into your prepared dish and compact down with the back of a wooden spoon or spatula. Place in the oven for 35-40 minutes until lightly golden. Remove and allow to cool completely before portioning up. [Note: make sure it is completely cold before cutting otherwise it will crumble all over the place. I like to put mine in the fridge overnight just to be sure!]

![JK_Email Signature 2018_96dpi[3][189].png](https://images.squarespace-cdn.com/content/v1/55e533f4e4b02deb84910f6a/1540791763715-X1MI7XNIKEOWA2BLUJHN/JK_Email+Signature+2018_96dpi%5B3%5D%5B189%5D.png)
